Have you ever wanted to try something new on your website, but you were afraid it might go wrong and leave you with a broken site? Or maybe you want a second website that is is a close match to an existing one? Creating a copy of your live (or "production") site gives you the opportunity to explore changes to its current configuration with less risk. This tutorial will show you how to create a copy (or "development") website using a backup of your production site.
Step 1: request the new site
If your site is in the Stanford Sites Drupal 7 environment, you'll want to request the new site first. You will receive an email when the new site is ready.
- Navigate to https://sites.stanford.edu
- Click the green Request a website button on the top right of the page to bring you to the Administer My Sites page
- Click Create a new instance for a group or department button
- If you are creating a development site, enter the name of your production site as the Website Short Name and append it with "-dev"
- Complete the remainder of the form.
For more information on requesting a site, see Getting Started on Sites: How to Request a new Drupal Site
Step 2: prepare your current production site
1. Configure the Pathologic Module
Images and URLs in content are tricky to manage when moving or copying a site. Even though an image file is copied to the new site, its URL in the content may continue to reference the image in the old site, and you end up with an image that doesn't show up as it should. Configuring the Pathologic module will assist in converting links to point to the image files on the new site. Check out these directions for configuring the Pathologic module.
2. Log in as User 1 or Admin
The first user created on a Drupal site is called "User 1." This user has special privileges in Drupal. When using the Backup and Migrate module, it is best to log in as User 1. For websites on Stanford Sites, the User 1 account will have the name "admin." If you are logged in with your SUNetID, you will need to log out and log in as "admin."
Step 3: prepare your new development site
1. Check that you have the same modules
Your new site must have all the same modules and themes as the production site. If you are hosting your existing production and new development site on the Stanford Sites environment you should have all necessary modules available. Contact Stanford Web Services if you have questions regarding your site hosted on Stanford Sites. (One exception is websites created with the Stanford Sites Jumpstart service; for these, contact Stanford Web Services through your website "get help" section, and we will create a development site for you.)
If your custom Drupal site is not on Stanford Sites, but is hosted elsewhere at Stanford or beyond, make sure that the new site has all the same modules as the production site.
Warning: If the modules do not match, your restore will fail, and your new site may be unusable.
2. Start with a clean new site
You should start your new site with a clean database and files; in other words, the new site should have no content. This copy process does not necessarily remove old content and may simply add to any existing content on the new site.
Step 4: enable modules
You will need to enable Backup and Migrate and Backup and Migrate Files modules on both the production and the new sites. Follow these directions for both sites:
- Navigate to: Modules (admin/modules)
- Check the select boxes for both the Backup and Migrate and the Backup and Migrate Files modules
- Scroll to the bottom of the page and click Save configuration
Step 5: create a backup from the production site
Starting on your production site, create backups of both the database and the files. The database holds the majority of the content and configuration information. The files consist of any images and files, such as PDFs, that have been uploaded to the site.
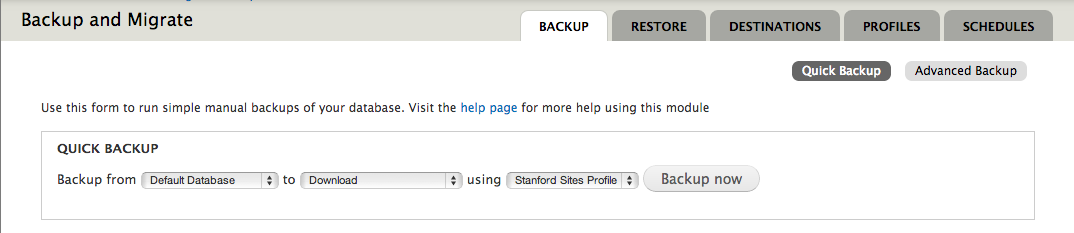
Backup the database
- Navigate to Backup and Migrate at Configuration > System > Backup and Migrate (admin/config/system/backup_migrate)
- On Backup > Quick Backup, select options as follows:
Backup from Default Database to Download using Stanford Sites Profile - Click Backup now
- A database copy file will be created with a suffix of mysql.gz. Save File and click OK.
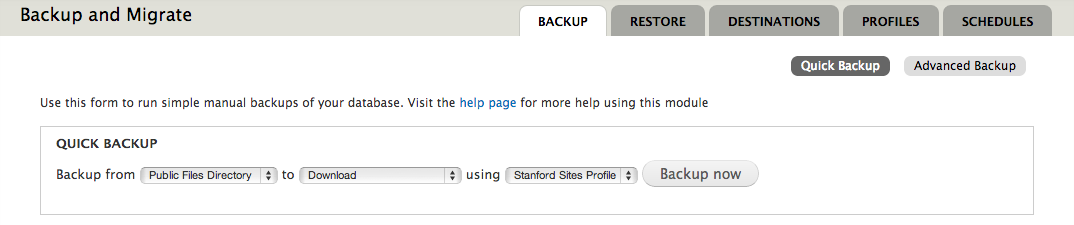
Backup the files
- Start again at Backup and Migrate at Configuration > System > Backup and Migrate (admin/config/system/backup_migrate)
- Under Backup > Quick Backup select options as follows:
Backup from Public Files Directory to Download using Stanford Sites Profile - Click on Backup now
- A files archive file will be created with a suffix of tar.gz. Save File and click OK.
The Backup and Migrate modules should have downloaded two files onto your local machine:
- A copy of the production database
- An archive of the files from the production site
The database copy will have a suffix of mysql.gz, and the files archive will have a suffix of tar.gz. You will use these downloaded files to populate your new site. For this, use the restore process, which is the reverse of the backup process.
Step 6: populate the development site
In the restore process, you will replace the current database and files on your development website with the database and files from the production website. Starting on your development website:
Restore the database
- Navigate to Backup and Migrate at Configuration > System > Backup and Migrate (admin/config/system/backup_migrate)
- Click the Restore tab, and select options as follows:
- Select Restore to Default Database
- Under Upload a Backup File, click on Choose File to bring up the file manager for your computer
- Select the database file you downloaded from the production site (that's the msql.gz file)
- Click on Open to stage the file for loading
- Click on Restore Now to replace the current database with the database from the production server

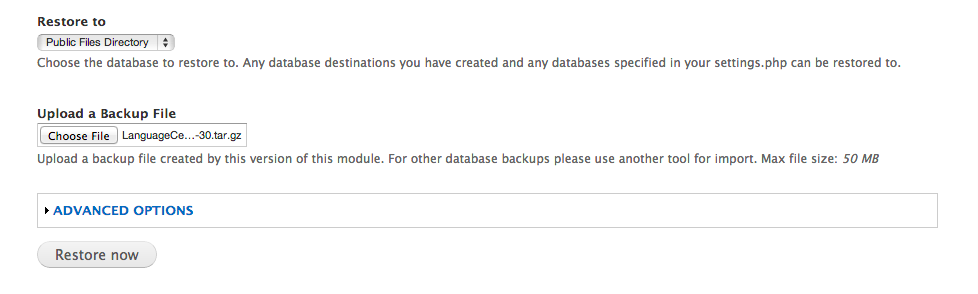
Restore the files
- Again, navigate to Backup and Migrate at Configuration > System > Backup and Migrate (admin/config/system/backup_migrate)
- Click the Restore tab, and select options as follows:
- Select Restore to Public Files Directory
- Under Upload a Backup File, click on Choose File to bring up the file manager for your computer
- Select the tar file of the files you downloaded from the production site (that's the tar.gz file)
- Click on Open to stage the file for loading
- Click on Restore Now to replace the files on your website with the files from the production server
Step 7: test your work
Once you've migrated both the database and files onto your new development website, it should be ready to go. Click around on the new site, and make sure it functions as expected.
Congratulations! You did it!
Troubleshooting
- If the cloned site doesn't appear: The site may need more processing time, or you may need to clear the cache. If the site is not responsive, log in to the server and clear the cache from the command line (e.g. drush cc all). If this site is on the sites.stanford.edu hosting, you can submit a HelpSU for this request.
- If the Migrate Files fails: This could be due to the large amount of space required by the files (e.g. Max-execution time exceeded).
More information
- Read more about the Stanford Sites Backups and Development Environments
Related Posts
The Pathologic Module assists with broken links in your content. Read more on this post about how to configure Pathologic.