Skip to content Skip to navigation

Site Retired

As of May, 2022, this website is no longer updated and has been replaced with a static copy.

John Bickar's Blog Posts

Photo of John Bickar Posted by John Bickar on Monday, July 14, 2014 - 6:02am

Today we're going take a look at the Path Redirect Import module, which lets you import redirects in bulk into your Drupal site.

All of the modules described in this post are available on Stanford Sites.

What Are Redirects, and Why Do I Care?

A redirect is when you take a user from one URL (or path) on your website and send him to another URL, without any action on his part. If you learned HTML back in the good ol' days, you may be familiar with the following code:

<meta http-equiv="refresh" content="0; url=<a href="http://example.com/">

">http://example.com/">
[/geshifilter-code]

That's what's known as a "Meta refresh", and it's how things were done back in the day. (Unfortunately, meta refreshes are slow and janky, and there are better ways to do them now.)

There are several reasons why you might want to put a redirect(s) in place:

  • You have renamed a page, or updated its path
  • You have restructured your website
  • You have completely rebuilt your website (e.g., moved from static HTML to a Content Management System, such as Drupal) and you want to redirect pages that end in ".html" to their semantic equivalents

Stanford users may be familiar with redirects in the context of the "WWW to Web" migration from Summer, 2014.

One Redirect

The Redirect module in Drupal allows you to create redirects one at a time.

  1. Go to admin/config/search/redirect/add
  2. Enter the source path in the From field
  3. Enter the destination path in the To field
    • The destination can be a path, if it's in your Drupal site, or a full URL if you want to redirect to an external website (cf. "Rickroll")
  4. Almost all the time, you will want to leave Redirect status set to "Default (301)". You can learn more about HTTP status codes at HTTP Status Dogs.

Screenshot of adding redirects, described above

Many Redirects

"Great, but what if I want to create 100 redirects?"

Enter the Path Redirect Import module. It allows you to create a .csv file of multiple redirects, and import them in a batch.

First, be sure you have enabled the module; it is labeled as "Redirect Import" at admin/modules, and it is not enabled by default on Stanford Sites.

Next:

  1. Create a spreadsheet with the following columns: old_url, new_url, redirect_code, language
  2. Populate that spreadsheet with all of the values that you would put in the From and To fields when creating redirects one at a time
    • redirect_code should be "301"
    • language should be "en"
    • Remember that the From paths are relative to your Drupal install; in the example below, we are presuming that we are moving from a static HTML website to Drupal, therefore we want to redirect users who have bookmarked "foo.stanford.edu/contact/index.html" to "foo.stanford.edu/about/contact-and-location".
  3. Save the spreadsheet as a "Comma Separated Values (.csv)". If you are using MS Excel on a Mac, save as "Windows Comma Separated (.csv)"
  4. Go to admin/config/search/redirect/import
  5. Upload your .csv file by clicking the "Choose File" button
  6. Leave the other form fields as their defaults
  7. Click the "Import" button

Your redirects will be imported, and you will see a message describing how many redirects were created, and how many failed.

You can download a sample .csv file here.

Screenshot of comma separated values file, described above

Path Redirect Import screen, described above

Technical Details and More Information

  • Be sure to fill out the "redirect_code" and "language" columns, even if you just want to accept the defaults. See "Language column is required in .csv" for more details.
  • The Redirect module implements the redirection in hook_init(), and adds about 400ms to the page load time to perform the redirect. Therefore if you are able to edit your site's .htaccess file, and have a limited number of redirects, it is probably better to implement the redirects at the .htaccess level.
  • The Redirect module cannot do wildcard redirects. See "Support wildcards in path matching" for more details.
  • Path Redirect Import implements Drupal's Batch API, so the number of redirects that you can import is theoretically unlimited. I have not tried beyond 100 or so, however.

 

Posted in:
Photo of John Bickar Posted by John Bickar on Monday, June 9, 2014 - 4:49am

If you spend a lot of your day at the command line (as I do), you're constantly on the lookout for new tools and tricks to increase your productivity and efficiency. Today we're going to take a look at the pushd suite of commands that exist in most shells (e.g., bash, tcsh and so forth).

What Do These Commands Do?

pushd, dirs, and popd help you move around your directory structure more efficiently. In short, they are cd on steroids.

Command Usage

cd

cd is pretty straightforward, and limited. cd <directoryname> to switch to that directory; cd - to switch back to where you were previously.

  ~$ cd /Applications/
  /Applications$ cd -
  /Users/jbickar
  ~$
 

pushd

pushd allows you to save a series of directories in your history, and later navigate back to any directory in the history. It also echoes, in a single line, what's in the history (or "stack"):

  ~$ pushd /Applications
  /Applications ~
  /Applications$
 

The above command, pushd /Applications, set /Applications as my current working directory, and echoed back the two directories in the stack, /Applications and ~, separated by a space.

Add a few more locations into the stack by using pushd some more:

  /Applications$ pushd /Users
  /Users /Applications ~
  /Users$ pushd /Applications/Utilities/
  /Applications/Utilities /Users /Applications ~
  /Applications/Utilities$
 

dirs

Use the dirs command to view what's in your history.

  /Applications/Utilities$ dirs -v
   0  /Applications/Utilities
   1  /Users
   2  /Applications
   3  ~
 

Then use pushd +n to navigate to the nth item in your history:

/Applications/Utilities$ pushd +2
/Applications ~ /Applications/Utilities /Users
/Applications$ dirs -v
 0  /Applications
 1  ~
 2  /Applications/Utilities
 3  /Users
/Applications$ pushd +1
~ /Applications/Utilities /Users /Applications
~$

popd

Use popd to remove the top location in the history (which is index 0, or where you currently are) and return to the previous location (which is index 1):

/Applications/Utilities$ dirs -v
 0  /Applications/Utilities
 1  /Users
 2  /Applications
 3  ~
/Applications/Utilities$ popd
/Users /Applications ~
/Users$

pushd in a Terminal window

Thanks to JB Christy in University Communications for introducing me to the pushd commands!

Further Reading

Posted in:
Photo of John Bickar Posted by John Bickar on Thursday, June 5, 2014 - 6:40am

Linnea Williams and I participated in the "Scaling Drupal for Higher Ed" panel discussion at DrupalCon Austin on June 5th, 2014.

Video of the session is now available, and you can download a PDF copy of our slides here.

Posted in:
Photo of John Bickar Posted by John Bickar on Monday, May 12, 2014 - 9:09am

Today's "Module of the Day" is a handy little module called JS Injector that allows you to insert snippets of Javascript into your site.

In this post, I'll walk through how to enable and configure the module, use it to shout, "Hello, World!", and then go into some more advanced configuration.

Enable the Module

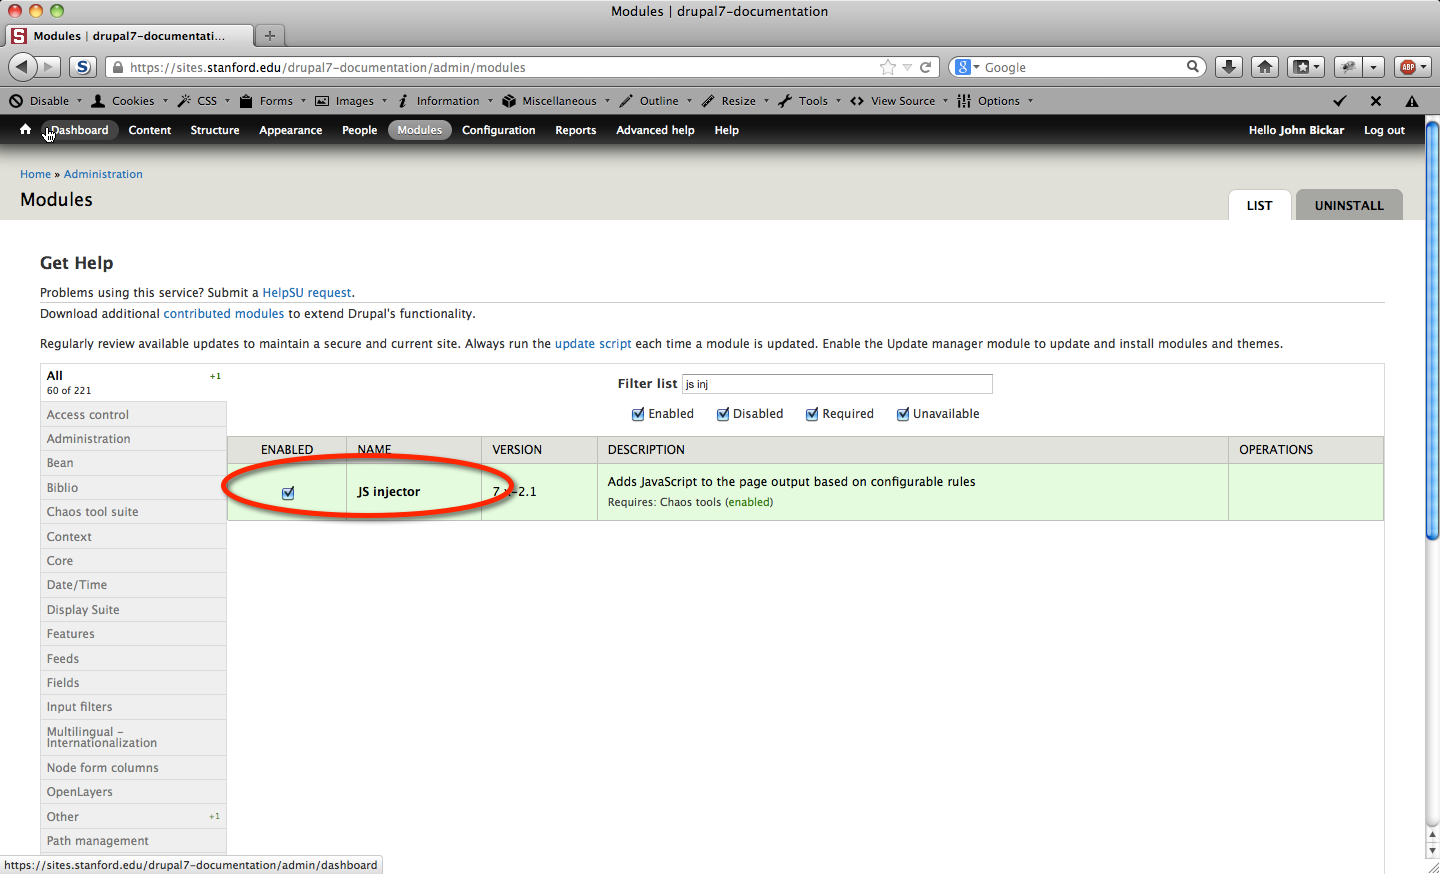
To use the module, you must enable it. This module has recently been installed on Stanford Sites and does not get enabled by default.

Go to admin/modules, check the box for "JS Injector", and click save.

Screenshot of enabling JS Injector

(What's that fancy user interface at admin/modules? That's Module Filter.)

Add a JS Injector Rule

Go to admin/config/development/js-injector and click the "+Add" link (or go directly to admin/config/development/js-injector/add):

Screenshot of adding a new JS Injector rule

Creating a "Hello World" JS Injector Rule

Create a new rule with the following settings:

  • Friendly name: hello_world
  • Description: Greets the world
  • JS Code:

    alert('Hello, World!');
  • Placement Options
    • Position of the javascript: Usually you would want to leave this set to "header"
    • Preprocess JS: For development and testing purposes, leave this unchecked; once your Javascript code is finalized and your site is in production, check this box
    • Inline JS: Usually you would want to leave this unchecked
  • Pages: Choose "The listed pages only", and enter "<front>" in the text box. This will run the Javascript only on the front page.

Then save the rule.

Screenshot of the above JS Injector rule settings

See Your JS Injector Rule in Action

Go to your home page and get your greeting!

Hello, World!

Doing More With JS Injector

So now you have a "Hello, World!" alert greeting you every time you open your front page. You may think you have reached the pinnacle of human achievement on the Intertubes, but there is, in fact, more that you can do with JS Injector. (Go ahead and delete your "Hello World" JS Injector rule, as a service to humanity.)

Use Some jQuery

Drupal bundles jQuery with default installs, and that means you can use jQuery functions and selectors to select and manipulate elements in the DOM.

Add a new JS Injector rule and use the following Javascript/jQuery code:

jQuery(document).ready(function($) {
  $('h2').attr('class', 'awesomesauce');
});

And set it to display on the front page.

jQuery JS Injector rule

Load your front page and inspect the <h2> element and see that it has the class="awesomesauce" attribute:

An h2 element with the awesomesauce class

You can use the full range of jQuery functions in JS Injector. Just remember to wrap your jQuery code in jQuery(document).ready(function($) {}); like so:

jQuery(document).ready(function($) {
  // do ALL THE THINGS here
});
Posted in:
Photo of John Bickar Posted by John Bickar on Monday, April 14, 2014 - 8:59am

As a follow-up to my post on configuring your Drupal site for improved performance, in this post I will detail how to go a little further using the XML Sitemap module to create a sitemap, and then using the ITS Scheduling Service to set up a cron job to "prime" the page cache for all pages in the sitemap. This will give anonymous users the benefit of always loading the cached version of a page.

Why Would I Want to Do This?

The first time that Drupal serves up a given page, it has to run many database queries to pull together all of the various components of the page (e.g., the menu(s), block[s], View[s], HTML content, etc.). This process can take a good deal of time. If Drupal's page caching is enabled for anonymous users, Drupal will store (or "cache") the rendered HTML content of the page in the database, and serve that cached HTML to subsequent anonymous users. This means one database query, instead of dozens or hundreds.

However, Drupal still must do the heavy lifting of all those database queries to generate the final HTML output. The technique outlined below will ensure that a machine visitor is the one who gets the slow initial first page load, not a human visitor.

On high-traffic sites, this technique is usually not necessary, as there is enough anonymous traffic to generate cached pages. However, on low-traffic/high-value sites, this technique can offer sizable performance gains.

XML Sitemap is available to all personal, group, and department websites hosted on Stanford Sites.

Configuring XML Sitemap

In this example, I am just going to add the main menu links to the XML sitemap (for brevity). Typically, the main menu contains your most important pages, so therefore they are the ones that you want to be fast all the time. You can use additional XML Sitemap submodules to add users, nodes, taxonomy terms, and custom links to a sitemap as well.

  1. Enable the XML sitemap and XML sitemap menu modules
  2. Go to admin/structure/menu/manage/main-menu/edit to configure the XML sitemap settings for your main menu
  3. Change the Inclusion setting to "Included"
  4. Set the Default priority to 1.0

    XML sitemap settings on main menu config page
  5. Clear all caches
  6. Run cron
  7. Go to mysite.stanford.edu/sitemap.xml to view your XML sitemap

    The XML sitemap

The sitemap alone will provide benefits such as increased visibility in search engines. However, we also are going to leverage the sitemap to make your site always speedy for anonymous visitors.

Create Your Cache Priming Script

The next step is to create a script to anonymously hit all the pages in your sitemap. This will "prime" or "warm" the cache, by forcing Drupal to generate a cached version of each page in the sitemap. We use wget, in part because it does not run Javascript, so running this script on a regular basis will not artificially inflate stats in Google Analytics, for instance.

  1. In an AFS directory of your choosing, create a shell script with the following content:

    #!/bin/bash
    #
    # Use the sitemap and reload the Page Cache by accessing each page once
    #

    wget --quiet <a href="https://mysite.stanford.edu/sitemap.xml">https://mysite.stanford.edu/sitemap.xml</a> --output-document - | egrep -o "<a href="https://mysite.stanford.edu/[">https://mysite.stanford.edu/[</a>^<]+" | wget -q --delete-after -i -

    (Replace mysite.stanford.edu with the URL of your website.)

  2. For this example, I am going to create the script in the "cgi-bin" directory in the "mygroup" AFS space, and name it "cache-prime.sh", so the script will live at /afs/ir/group/mygroup/cgi-bin/cache-prime.sh. This information is important for subsequent steps.
  3. Make the script executable by running:
    chmod 755 /afs/ir/group/mygroup/cgi-bin/cache-prime.sh

    (Replace "group/mygroup" with the path to your AFS group space)

You can run the script manually by entering /afs/ir/group/mygroup/cgi-bin/cache-prime.sh at a command prompt, then hitting Enter.

Setting Up the Cache Priming Cron Job

We have a sitemap, and a script to hit all the pages in that sitemap. The next step is to set up a recurring job to call our script at regular intervals.

  1. Go to https://tools.stanford.edu/cgi-bin/scheduler and click the "Create New Job" button

    Create a new job on the scheduling service
  2. Command: "/afs/ir/group/mygroup/cgi-bin/cache-prime.sh"
  3. Run this command as this principal: "group-mygroup/cgi"
  4. Make the Job Active? "Yes, execute as directed"
  5. Mail command output? "No, email only errors"
  6. Send email to: Your email address
  7. Description: Drupal cache prime script
  8. Schedule
    • Custom Schedule: Run this command...on a custom schedule
      • Months: Every Month
      • Days each month: Every Day of Month
      • Days each week: Every Day of Week
      • Hours: Choose times that correspond to one-half of your minimum cache lifetime. For example if your cache lifetime is set to 1 day, choose 0600 and 1800
      • Minutes: OK to leave at :00, or you can tweak this to your liking to not run at the top of the hour

        Schedule the cache priming script to run

If you are familiar with cron syntax this form is just a GUI to that same functionality.

Is the Page Cached?

If you are using Drupal's core caching functionality, you can determine whether Drupal is serving up the cached version of a page by checking for the X-Drupal-Cache: HIT HTTP header.

OK, how do I do that?

  • You can use the Live HTTP Headers Firefox plugin
  • You can use a one-line bash script like this:
    #!/bin/bash

    curl -fsIL $1 2>&1 | grep -q -m 1 "X-Drupal-Cache: HIT" && echo "Yes, this page appears to be cached." || echo "No, this page does not appear to be cached."

    I have this saved as a file named is-cached at the root of my hard drive, so I just run:

    $ /is-cached <a href="https://swsblog.stanford.edu
    Yes">https://swsblog.stanford.edu
    Yes</a>, this page appears to be cached.

Further Reading

Posted in:
Tags:
Photo of John Bickar Posted by John Bickar on Monday, March 17, 2014 - 10:09am

The modern Web is a dynamic place. However, sometimes it's necessary (or desirable) to remove the dynamic functionality of a website, while preserving its static content.

Inspired in part by Karen Stevenson's excellent blog post, "Sending a Drupal Site into Retirement," I wanted to outline a few other techniques for accomplishing this.

Reasons you may want to create a static copy of a site:

  • The site runs on an outdated version of dynamic web software
  • The site has been hacked, but its content is still relevant
  • The site's content has lost its immediacy, but may need to be revived in the future as a dynamic website
  • The site was built in 2004 in ColdFusion by a vendor that has flown the coop (oops)

Method One: wget

Wget is a cross-platform command-line program for retrieving web pages. It's almost like it was built to do this.

Run the following code to crawl www.example.com and save it as flat files to an arbitrary directory of your choosing (noted by /path/to/destination/directory):
 wget -P /path/to/destination/directory/ -mpck --user-agent="" -e robots=off --wait 1 -E <a href="https://www.example.com/">https://www.example.com/</a>

See this code explained on explainshell

More Information for the Stanford Web Environment

If you have a Drupal, WordPress, or MediaWiki site hosted on the Stanford WWW servers (AKA "AFS"), you can use the wget method to create a static copy of your site in cgi-bin.

Assuming you have a site at http://ponies.stanford.edu and it lives at /afs/ir/group/ponies/cgi-bin/drupal.

  1. SSH into corn.stanford.edu
  2. Run the following command:
     wget -P /afs/ir/group/ponies/WWW/ -mpck --user-agent="" -e robots=off --wait 1 -E <a href="http://ponies.stanford.edu/">http://ponies.stanford.edu/</a>
  3. Visit http://www.stanford.edu/group/ponies/ponies.stanford.edu in a browser; you should have a full copy of your production site
  4. You may have to do some cleanup of the HTML code, and may want to rename the directory using the following command:
    mv /afs/ir/group/ponies/WWW/ponies.stanford.edu /afs/ir/group/ponies/WWW/static
  5. Once you've checked everything out and it looks good, you can submit a Virtual Host change request so that ponies.stanford.edu points at www.stanford.edu/group/ponies/static
  6. If you want to then delete the dynamic site, submit a HelpSU request.
  7. Note: if the site is a Drupal site, you may want to disable CSS and Javascript aggregation, so that wget will grab the original source versions of those files

Method Two: Drupal's "Disable All Forms" Module

If it's a Drupal site, you can use the Disable All Forms Module. This module does exactly what it says: it disables all forms. Using it requires Bad Judgement (sic).

This method works well if you may want to revive the Drupal site at some point in the future, but don't want to deal with spammers and other malcontents.

Method Three: WordPress Plugin

There are a variety of WordPress plugins to create a static copy of a WordPress site.

See Also

Posted in:
Photo of John Bickar Posted by John Bickar on Thursday, February 20, 2014 - 3:29pm
IT Services will perform updates for the Stanford Sites Drupal hosting service, including individuals' websites hosted on people.stanford.edu, on the following dates:
 
  • Saturday, February 22, from 5 - 8 a.m.
  • Sunday, February 23, from 5 - 8 a.m.
Changes include security patches and upgrades for both Drupal 6 and 7 sites. See below for a complete list. (Note: updates to group and department sites on sites.stanford.edu have already been completed.)
 

Websites are scheduled to receive upgrades on a rolling basis. Please note that when the upgrade begins on an individual website, all logged-in users (if any) will be logged out, and the website will be placed offline temporarily. Visitors will see a message that the website is offline for maintenance. Security patches and database updates will be applied, and the website will be placed back online. We expect the website to be offline for approximately 1 minute during the updates.

If you experience issues with your website hosted on Stanford Sites, please submit a HelpSU request. We will respond as soon as possible.
 

What is included in the upgrade


Drupal 7:

  • drupal-7.25
  • admin_menu-7.x-3.0-rc4
  • advanced_help-7.x-1.1
  • bean-7.x-1.7
  • biblio-7.x-1.0-rc7
  • context-7.x-3.1
  • REMOVE context_inline_editor-7.x-1.0-beta1
  • context_list-7.x-1.1
  • context_list_active-7.x-1.0-alpha1
  • ctools-7.x-1.3
  • date_ical-7.x-2.13
  • ds-7.x-2.6
  • entity-7.x-1.3
  • entityreference-7.x-1.1
  • js_injector-7.x-2.1
  • metatag-7.x-1.0-beta7
  • rules-7.x-2.6
  • path_redirect_import-7.x-1.0-rc4
  • services-7.x-3.5
  • smart_trim-7.x-1.4
  • views-7.x-3.7
  • views_field_view-7.x-1.1
  • views_data_export-7.x-3.0-beta6
  • xmlsitemap-7.x-2.0-rc2


Drupal 6:

  • drupal-6.29
  • diff-6.x-2.3
  • js_injector-6.x-1.1
  • mollom-6.x-2.6
  • taxonomy_manager-6.x-2.3
  • token-6.x-1.19
  • transliteration-6.x-3.1
  • webform-6.x-3.19


Posted in:
Photo of John Bickar Posted by John Bickar on Monday, January 27, 2014 - 9:06am

In Drupal development land, the theme is what controls the final HTML, CSS, and Javascript that get delivered to the browser.

Sometimes, however, in developing a custom module, you want to provide a suggestion for an HTML framework, and not rely on the theme's default implementation of a given block of HTML.

You may ask yourself:

Can I use .tpl.php files in a Drupal module?

(And you may ask yourself, "How do I work this?", and you may ask yourself, "Where is that large automobile?")

Enter hook_theme_registry_alter()

Drupal's API includes a nifty function named hook_theme_registry_alter(). This hook allows you to - wait for it - alter the theme registry. The theme registry "maintains cached data on the available theming hooks and how to handle them". By altering the theme registry, you can tell Drupal to look elsewhere for theme templates (e.g., *.tpl.php files).

See What's in the Theme Registry

  1. Install and enable the Devel module
  2. Call dpm($theme_registry) in your custom module:

    function mymodule_theme_registry_alter(&$theme_registry) {
      dpm($theme_registry);
    }
                   
  3. Clear your theme-registry cache: drush cc theme-registry

  4. Reload the page, and you then get a nice Krumo display of the entire $theme_registry array.

    Screenshot of a Krumo output of the $theme_registry variable

  5. In this case, we want to override the search page "no results" language (which has been the subject of contentious debate) with a custom template.
    Screenshot of the default Drupal search page for no results found
  6. $theme_registry['search_results'] looks like this:

    Array
    (
        [variables] => Array
            (
                [results] =>
                [module] =>
            )

        [file] => search.pages.inc
        [template] => modules/search/search-results
        [type] => module
        [theme path] => modules/search
        [includes] => Array
            (
                [0] => modules/search/search.pages.inc
            )

        [preprocess functions] => Array
            (
                [0] => template_preprocess
                [1] => template_preprocess_search_results
                [2] => contextual_preprocess
            )

        [process functions] => Array
            (
                [0] => template_process
                [1] => rdf_process
            )

    )

    Screenshot of a Krumo output of just the $theme_registry['search_results'] array

Alter the Theme Registry

We're going to override that setting in the theme registry, and tell the theme system to look in our custom module (named "mymodule") for a template:

function mymodule_theme_registry_alter(&$theme_registry) {
  // tell the theme system to look in the "templates" subdirectory within our module directory
  $theme_registry['search_results']['theme paths'] = array(0 => drupal_get_path('module', 'mymodule') . '/templates');
  $theme_registry['search_results']['theme path'] = drupal_get_path('module', 'mymodule') . '/templates';
  $theme_registry['search_results']['path'] = drupal_get_path('module', 'mymodule') . '/templates';
  // tell the theme system to use 'search-results.tpl.php' as the template file. Note that you do not include 'tpl.php'
  $theme_registry['search_results']['template'] = 'search-results';
}

Our search-results.tpl.php file looks like this:

<?php
$content = '<ul>';
$content .= '<li>' . t('Check if your spelling is correct.') . '</li>';
$content .= '<li>' . t('Simplify your search by using fewer words.') . '</li>';
$content .= '<li>' . t('Remove quotes around phrases to match each word individually: %stanfordquote will match less than %stanfordnoquote.', array('%stanfordquote' => '"stanford university"', '%stanfordnoquote' => 'stanford university')) . '</li>';
$content .= '<li>' . t('Consider loosening your query with <em>OR</em>: <em>stanford university</em> will match less than <em>stanford OR university</em>.') . '</li>';
$content .= '</ul>';
?>
<?php if ($search_results): ?>
  <h2><?php print t('Search results');?></h2>
  <ol class="search-results <?php print $module; ?>-results">
    <?php print $search_results; ?>
  </ol>
  <?php print $pager; ?>
<?php else : ?>
  <h2><?php print t('Your search did not yield any results');?></h2>
  <?php print $content; ?>
<?php endif; ?>

The Results

Now our $theme_registry['search_results'] looks like this:

Array
(
    [variables] => Array
        (
            [results] =>
            [module] =>
        )

    [file] => search.pages.inc
    [template] => search-results
    [type] => module
    [theme path] => sites/all/modules/mymodule/templates
    [includes] => Array
        (
            [0] => modules/search/search.pages.inc
        )

    [preprocess functions] => Array
        (
            [0] => template_preprocess
            [1] => template_preprocess_search_results
            [2] => contextual_preprocess
        )

    [process functions] => Array
        (
            [0] => template_process
            [1] => rdf_process
        )

    [theme paths] => Array
        (
            [0] => sites/all/modules/mymodule/templates
        )

    [path] => sites/all/modules/mymodule/templates
)

Screenshot of a Krumo output of just the $theme_registry['search_results'] array, after it has been altered

And our search results page looks like this:

Screenshot of the modified Drupal search page for no results found

Note that "bike shed" has been replaced by "stanford university"

See Also

Posted in:
Photo of John Bickar Posted by John Bickar on Tuesday, October 22, 2013 - 11:32am

Overview

In August, 2013, the Administration Views module was updated from 7.x-1.0-alpha1 to 7.x-1.0 on Stanford Sites. This update has the potential to cause several issues, manifesting in one or several of the following ways:

  • A "Trying to get property of non-object in user_access()" error message
  • A "page not found" or "Access Denied: This content has been restricted by the author or by the site administrator." error message when trying to access admin/content
  • The "Content" menu item in the black Administration Menu (between "Dashboard" and "Structure") disappears

Background

The Administration Views module overrides system lists of things (nodes, users, comments) with actual Views, and replaces them at the appropriate path (e.g., admin/content). Between versions 1.0-alpha1 and 1.0, the machine names for those Views changed, like so:

1.0-alpha1 1.0
admin_content_comment admin_views_comment
admin_content_node admin_views_node
admin_content_taxonomy admin_views_taxonomy_term
admin_user_user admin_views_user

If you had overridden the default View (e.g., admin_content_node) from 1.0-alpha1, so that it is stored in the database, the update to admin_views-7.x-1.0 causes great sadness, as detailed above.

The Fix

For admin/content

The fix below details how to resolve the issue for the View at admin/content; fixing the other Views follows the same process.

  1. Go to admin/structure/views
  2. Do a "find" (Cmd+F [Mac] or Ctrl+F [Windows/Linux]) for "admin_content_node"
  3. Verify that its status shows as "in database", and proceed to Step 4. (If it does not show as "in database", or you do not have a View named "admin_content_node", these troubleshooting steps may not apply.)
    Screenshot showing the View named admin_content_node as in the database
  4. Find the View entitled "Administration: Nodes" and disable it:
     Nodes View
  5. Do the same for any of the other Views listed in the table above
  6. Clear the menu cache

Other Solutions

There are a couple of other ways to resolve this issue; the fundamental problem is that two Views live at the same path.

  • Alternative #1: Disable the admin_content_node View.
  • Alternative #2: Give one of the two Views ("Administration: Nodes" or admin_content_node) a new path.

Further Reading

Posted in:
Photo of John Bickar Posted by John Bickar on Friday, October 11, 2013 - 9:03am

The Menu Position module provides a powerful way for Drupal to create "virtual" menu items, and provides a graphical user interface to do so. However, as a developer, sometimes you want to create those rules in code. Here's how.

I did some Googling on this for a while, and came up short. The best answer I found was stalled in the Menu Position 7.x-2.x issue queue, and stymied by the fact that mlid values are not stable from site-to-site.

Overview

Menu Position Rule by Content Type

Let's say you want to create a menu position rule, "All Event Nodes", to create a virtual menu item for every Event node under the top-level "Events" item in the main menu.

First, you want to use module_load_include() to load the menu_position.admin.inc include file, so that you have access to the menu_position_add_rule() function:

// load the menu_position.admin.inc include file
module_load_include('inc', 'menu_position', 'menu_position.admin');

Next, you want to get the mlid of the parent menu link item for your Menu Position rule:

// Grab the mlid of the parent menu link item
$result = db_select('menu_links', 'm')
  ->fields('m', array('mlid'))
  ->condition('menu_name', 'main-menu') // "main-menu" is the machine name of the Main Menu.
  ->condition('depth', 1) // assuming a depth of 1 in our Main Menu
  ->condition('link_title', 'Events') // assuming there are no other menu items with a depth of 1 in our main menu that are also named "Events"
  ->execute()
  ->fetchAssoc();

$plid = $result['mlid'];

Finally, create an array with the details of your Menu Position rule, and save it:

// create the array to populate the rule
$rule = array(
  'admin_title' => 'All Event Nodes',
  'conditions' => array(
    'content_type' => array(
      'content_type' => array(
        'event' => 'event', // "event" is the machine name of the content type
      ),  
    ),  
  ),  
  'menu_name' => 'main-menu',
  'plid' => $plid,  // "Events" item in main menu.
);

// By calling menu_position_add_rule() here, we're assuming that this exact rule does not exist
menu_position_add_rule($rule);

Other Types of Conditions

Menu Position offers additional conditions beyond node type. Here are a few examples.

Path Condition

You would build your $rule array a little differently if you wanted to use a path condition:

$rule = array(
  'admin_title' => 'Events by Path',
  'conditions' => array(
    'pages' => array(
      'pages' => 'events/*', // activate the Menu Position rule on every path under "events/"
    ),  
  ),  
  'menu_name' => 'main-menu',
  'plid' => $plid,  // "Events" item in main menu.
);

Taxonomy Condition

You would want to do an additional lookup with taxonomy_vocabulary_machine_name_load() to look up a vocabulary's vid by name:

$vocabulary = taxonomy_vocabulary_machine_name_load('event_categories');
$vid = $vocabulary->vid;
$rule = array(
  'admin_title' => 'Events by Taxonomy',
  'conditions' => array(
    'taxonomy' => array(
      'vid' => $vid, // the vid of the "Event Categories" vocabulary (machine name "event_categories")
      'tid' => array(),
    ),
  ),
  'menu_name' => 'main-menu',
  'plid' => $plid,  // "Events" item in main menu.
);

Other Conditions Not Listed Above

Taxonomy, path, and content type were the only conditions I had a need for at the time I discovered this trick. However, you can decode other conditions by peeking at the conditions field in the {menu_position_rules} database table. The conditions are stored as a serialized array; you can use the PHP unserialize() function to get the array structure:

$ drush sqlq --extra="-t" 'select * from menu_position_rules limit 1'
+-----+-------------+---------+----------------------------------------------------------------------------------+-----------+------+------+--------+
| rid | admin_title | enabled | conditions                                                                       | menu_name | plid | mlid | weight |
+-----+-------------+---------+----------------------------------------------------------------------------------+-----------+------+------+--------+
|   1 | News        |       1 | a:1:{s:12:"content_type";a:1:{s:12:"content_type";a:1:{s:4:"news";s:4:"news";}}} | main-menu | 1173 | 1289 |      0 |
+-----+-------------+---------+----------------------------------------------------------------------------------+-----------+------+------+--------+

Using dpm() or print_r() shows you the array structure:

print_r(unserialize('a:1:{s:12:"content_type";a:1:{s:12:"content_type";a:1:{s:4:"news";s:4:"news";}}}'));

Array
(
    [content_type] => Array
        (
            [content_type] => Array
                (
                    [news] => news
                )
        )
)
Posted in:

Pages

Subscribe to John Bickar's Blog Posts