Skip to content Skip to navigation

Site Retired

As of May, 2022, this website is no longer updated and has been replaced with a static copy.

Caryl J Westerberg's Blog Posts

Caryl Westerberg Posted by Caryl J Westerberg on Monday, October 23, 2017 - 1:46pm

Drupal provides a powerful framework for creating custom elements for use in forms. One example of a custom element is the Link field. Suppose you want to change the default label on a Link field to read "Link text." How do you alter it?

 In his blogpost Custom Drupal Elements for Forms, Silvio J. Gutierrez provides a great explanation how to define a custom form element. Altering a custom form element follows in a similar manner.

To alter a custom form element:

  1. Register a process callback

  2. Create a process callback.

What’s a callback?

In Drupal a callback is a function that allows you to define how some type of processing happens. You pass this function name as a parameter to a Drupal API function and this function is then called at the appropriate time.

How do I register my callback?

When creating a custom form element you would use the #process attribute in hook_element_info() to register a callback. Similarly, when altering a custom form element you use the #process attribute in hook_element_info_alter() to register your callback. In this example, I want to make changes to Link fields. My code is as follows: 

/**
* Implements hook_element_info_alter().
*/
function my_module_element_info_alter(&$type) {
  if (isset($type['link_field'])) {
    $type['link_field']['#process'][] = 'my_module_link_field_process';
  }
}

How do I create my process callback?

The signature for a callback function for altering a custom form element is the same as if you were creating the element. See hook_element_info() for more information. In this case want to change the label for the Link field title. My code is as follows:


/**
* Process Callback Function
*
* Callback to process the My Module link field.
*/
function my_module_link_field_process($element, $form_state, $complete_form) {
  if (isset($element['#field_name'])) {
    switch ($element['#field_name']) {
      case 'field_s_my_link':
        $element['title']['#title'] = t('Link text');
        break;
    }
  }
  return $element;
}


Using these steps I was able to add help text and alter all sorts of custom form elements. Next time you have a custom element that needs even more customizing, give this a try, and let me know how it goes!

Acknowledgements

My thanks to my colleague Greg Garvey who pointed me to this solution!

Other resources:

See this discussion from the Link issue queue.

 

Posted in:
Caryl Westerberg Posted by Caryl J Westerberg on Tuesday, May 31, 2016 - 4:54pm

DrupalCon (Drupal Conference) 2016 marked the 3rd DrupalCon that I attended. With Drupal 8 released, I felt it was time to go to the conference and kick the tires.

Held in historic New Orleans, I not only learned more about Drupal 8, but I learned about the beignets, cemeteries, and handgrenades. But that’s for another story.

Drupal 8 brings a greater emphasis on “headless” architectures where the front-end that the user sees may be decoupled from a Drupal back-end. At this conference I focused on learning what we can do with a decoupled Drupal front-end. Here are my highlights from Drupalcon 2016:

Presentation Framework: Reveal.js

Want to ditch PowerPoint slides and move to something online and mobile responsive? Reveal.js  is a presentation framework used deliver many DrupalCon presentations. This was not a presentation itself, but rather, a technology, where, using HTML presentors can deliver rich presentations with lots of features and flexibility. If you want to try the fully-featured visual editor check it out at http://slides.com.

Amazing User Experiences with Drupal and Ember

by Edward Faulkner

Link to session

Want a richer experience for your site? It turns out that Ember provides a software development kit (SDK) to help you build out ambitious applications. In this session Faulkner first demonstrated how to integrate Drupal with Ember then demonstrated some amazing inter-page animations, Service Worker-driven offline capabilities, and in-site authoring tools with instant preview across multiple device sizes.

Offline-capable, decoupled Drupal 8 with React.js and React Native

By Mikkel Høgh and Dick Olsson

Link to session

People such as doctors travelling to remote areas without internet still need access to website data. To address this, they need websites to be available offline on their devices.  In this session Høgh and Olsson show us how they used React.js, PouchDB, and RELAXed to load an entire website onto a device such as a phone and make it fully capable offline.

Related links

Demystifying AJAX Callback Commands in Drupal 8

By Michael Miles at Genuine Interactive

Link to session

Suppose you want to use existing data to provide more functionality on an existing page on your site. In this session Miles dove into the internals of Drupal’s Ajax framework and demonstrated how you can extend an existing Drupal page, replace links with Ajax calls. Then when you click on the link, instead of navigating to the linked page, the current page expands to display the data from the linked page.

Related links

http://mike-miles.com/sessions/drupalcon-d8-ajax/#/ - Slides

Debugging, Profiling, & Rocking Out with Browser-Based Developer Tools!

By Mike Herchel at Lullabot

Link to session

Chrome’s Developer Tools has an amazing number of tools, options, and shortcuts for exploring the underpinnings of a website. In this session Herchel took us on a tour of these clever and timesaving tools. If you do any serious front-end development, learning these tools this is a must.

Related links:

BigPipe

By Wim Leers and Fabian Franz

Link to session

In this session Leers and Franz explore the question: How can Drupal start sending page data early? To give the perception of improved performance, users will see the page beginning to render earlier rather than seeing a blank white screen. Using caching, BigPipe sends page information early, and begin displaying the page before Drupal has completely finished rendered the page.

Related Link

https://www.drupal.org/project/big_pipe

JSON Powered Forms in Drupal

By Travis Tidwell and Randall Knutson

Link to session

As we support more devices, interfaces become more diverse. We cannot expect Drupal to support these interfaces. Travis Tidwell and Randall Knutson explained their approach to providing forms that are dynamic JavaScript renderings of JSON based schemas. With this JSON, the client can render the form for specific devices.

Related links:

Looking forward

The idea of decoupling Drupal from the front end is not new in Drupal 8. In fact many of these technologies will work on your Drupal 7 site, albeit less support from Drupal and more work for you. To learn more about decoupling Drupal, check out this post by Dries BuytaertI encourage you to keep an eye on the decoupled or headless Drupal conversation, and check out the videos for these sessions!

 
Caryl Westerberg Posted by Caryl J Westerberg on Friday, March 4, 2016 - 3:55pm

We are excited to announce that registration and session proposals are now open for Stanford Drupal Camp 2016!

Register now for the seventh Annual Stanford Drupal Camp April 1-2, 2016 at the Stanford Law School.

https://drupalcamp.stanford.edu/user/register

Drupal Camp is a great opportunity for the Stanford Drupal community to come together and share new approaches, best practices for the web, and love of Drupal. The schedule includes great sessions for those new to the web and Drupal all the way to advanced users and plenty of opportunities to network with colleagues.

We will have tracks for web content strategy, user experience and design, operations and development (DevOps), and building sites for research and academia.

As always, it’s free!

Once you've registered, you are invited to propose a session. In the right sidebar, click on Propose a Session!

If you have any questions, please contact drupalcamp@lists.stanford.edu

Happy Drupalling, and look forward to seeing you in April!

Posted in:
Caryl Westerberg Posted by Caryl J Westerberg on Wednesday, September 9, 2015 - 9:00am

Stanford Events is Stanford University's central calendar. It's widely used by departments, organizations, and student groups to promote events to the public and members of our campus community, and it provides a valuable resource for planning and scheduling. The challenge is cross-promoting events. In the past, sharing events content across multiple websites required re-typing. Ouch! We'll show you how to use the Stanford Events Importer module to save time and cross-promote events from multiple organizations.

The Stanford Events Importer module was designed to help organizations import their public events from Stanford Events into their Drupal website. Recently Stanford Events was updated with two new types of events feeds

  • unlisted
  • bookmarked

These great new feeds make it easier for organizations to post their own events on the Stanford Events website and share them with via their website, or to hand-select others' events from the calendar to cross-promote on their website.

Next, the Stanford Events Importer module was updated to support the new event feeds, making it even easier to import and display events on a Drupal website.

As an event administrator you can: 

  • post all your events on Stanford Events as either public or unlisted
  • use the planning calendar to identify upcoming events and potentially any events that may interfere with your event
  • import events for your website filtered by type, subject, organization, etc. through your organization's unlisted and bookmarked feeds

Here's how it works:

Adding Events to Stanford Events

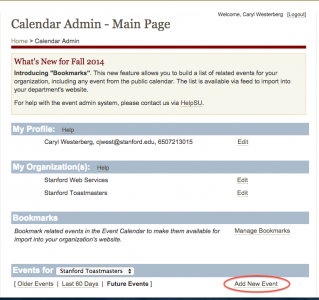
To create a feed and add your events to Stanford Events you'll need to request an account at http://events.stanford.edu/. Once you have an account, login and select Add New Event on the Calendar Admin - Main Page.

How to add a new event

Types of events on Stanford Events

When you add an event to Stanford Events you choose the status of an event, and that influences whether the event will be visible on the main calendar and which feeds you use to import them into your website.

Published events

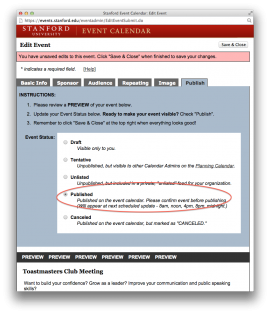
A published event displays on the central event calendar and will belong to the published feeds for your organization and any sponsor organizations.

How to select a published event

Unlisted events

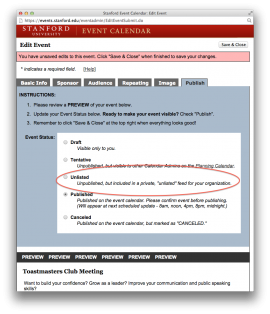
Unlisted events do not display on the central event calendar.  This allows organizations to create events on Stanford Events that are not exposed to the public, but are still available:

  • on the planning calendar
  • to sponsors
  • on the organizations's Unlisted feed

To add your event to your organization's unlisted feed, select Unlisted as the status of your feed.

Bookmarking events

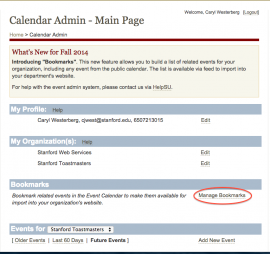
Bookmarks allow you to select any event on Stanford Events and add them to your Bookmarks feed. When you want an event to appear in your bookmarked feed, you would copy the URL and add it to the bookmarks for your organization.

Importing Stanford Events

Stanford Web Services (SWS) developed the Stanford Events Importer module to support importing published, unlisted, and bookmarked events. Special thanks to our colleagues in University Communications, VPGE, and the Department of Classics for their help in implementing and testing this module.

To import Stanford Events into your Drupal website:

  1. Log into your site
     
  2. Enable Events Importer on the Modules page
     
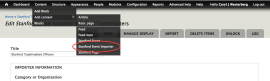
  3. Navigate to the add Stanford Event Importer page at

    Content > Add Content > Stanford Event Importer


  4. Give your Importer a title such as "Stanford Toastmasters Published"
     
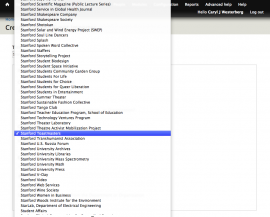
  5. Select your organization, i.e. "Stanford Toastmasters"


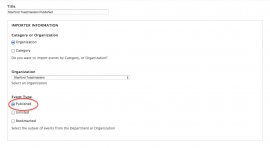
  6. Select the Event Type for this feed, i.e. "Published"

    Select published Event Type

  7. Save your new event importer. When first saving your event importer, it will automatically import the events from Stanford Events. 
     
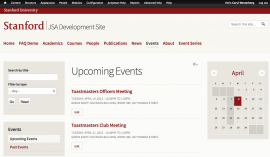
  8. Navigate to the events page, and you should have events!

Look we have events!


Embedding a Stanford Event RSS Feed

To embed an RSS Feed onto your site, you can follow this guide from the Stanford Events site.

Tip of the day

If you just added events to your feed, you may need to wait a day for Stanford Events to update.

Our goal is to connect systems in smart ways and make content maintenance just a little easier for website owners. Let us know what you think about the new events calendar and module changes!

Posted in:
Caryl Westerberg Posted by Caryl J Westerberg on Tuesday, September 8, 2015 - 9:30am

Would you like to display courses on your website? How about events or links to people profiles? The Stanford community provides a variety of web feeds which provide data or content that your Drupal website can leverage. 

Frequently the content you need on your website is already published on another website. Rather than adding this content manually to your website, you can use a web feed to import this published content from the source website and display it on your website. 

What is a web feed?

A web feed, such as an RSS or Atom feed, is content that is published on a website in a machine-readable format that can be downloaded by an application such as a feed-reader or another website. These feeds use EXtensible Markup Language (XML) to encode the data. You can identify a page with a web feed when it displays the following icon:

Example of an RSS feed icon

What Stanford feeds can I use on my site?

The Stanford community produces numerous feeds. At Stanford Web Services we are supporting the import of data from three feeds in particular:

  • Stanford Event Calendar
  • Explore Courses
  • CAP (Community Academic Profiles)

Stanford Event Calendar

Located at https://events.stanford.edu, Stanford Event Calendar is Stanford University's central source for event information.  

Visit the Events Calendar on Stanford's English Department website to see the Stanford Events Importer in action. Learn all about using Stanford Events feeds at Using Stanford Events on your Drupal Site

Screenshot of the Stanford Events homepage.

Explore Courses

Located at https://explorecourses.stanford.edu, the Explore Courses site displays course information for the current year. These courses are from the Stanford Bulletin, the official statement of degree programs and courses of instruction for Stanford University.

Visit the Current Courses page on Stanford's English Department website to see the Stanford Courses feed importer in action. To learn more about importing Stanford Courses see Importing Courses from ExploreCourses

Screenshot of a search on ExploreCourses website.

CAP (Community Academic Profiles)

The Community Academic Profile (CAP) directory features detailed profiles for faculty, students, postdocs, and staff. Along with education and work experience, these profiles can contain detailed information including publications, presentations, and courses taught.

Learn how link to your CAP profile at Linking to a Profile on StanfordWho.stanford.edu.

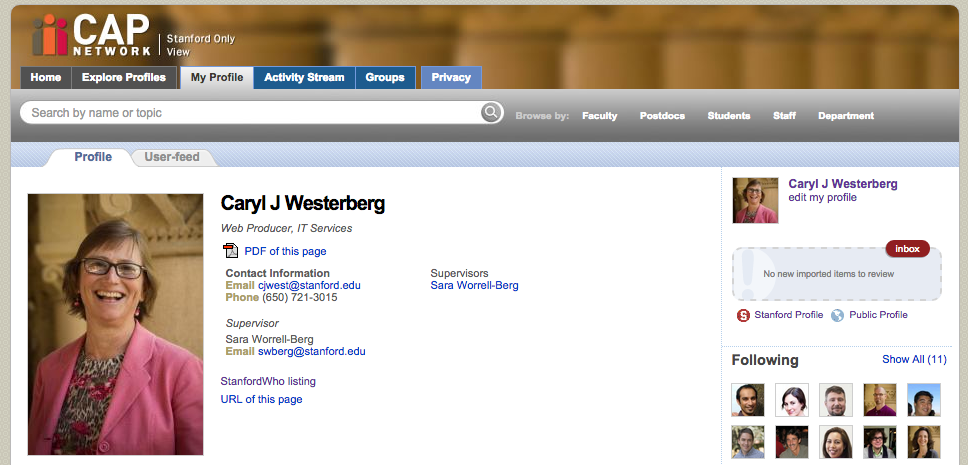
Screenshot of the author's profile

Keep your content up-to-date

As you populate your Stanford website, remember that you may be able to import that content and let your feeds keep your data up-to-date.

Caryl Westerberg Posted by Caryl J Westerberg on Thursday, August 27, 2015 - 1:00pm

Frequently, at Stanford Web Services we receive requests to build an intranet as part of a website. What exactly do people mean by "intranet?" Each department, lab, and institute might have different requirements an "intranet." Let's look at some different ways you might want to use an intranet and the tools available at Stanford that can help make your intranet possible.

What is an intranet?

According to our old friend Wikipedia, an intranet is:

“...a private network, accessible only to an organization's staff....[and] can constitute an important focal point of internal communication and collaboration, and provide a single starting point to access internal and external resources.”

From our experience we've met with a range of intranet requirements.  An organization may simply need a section of private pages that are protected under a login to keep more sensitive information limited to specific audiences. In other cases we see requirements for collaboration, interaction, and notifications. – a much more complex set of requirements. With such a diversity of needs for an "intranet," we are fortunate that Stanford offers several solutions addressing these intranet needs. Let's look at some intranet requirements and point out some tools that meet those requirements.

Support for communication and collaboration

If your organization needs support for communication and collaboration, Stanford provides a variety of productivity and collaboration tools including Google Talk, Adium, and Pidgin for instant messaging, and Confluence as a collaborative wiki and for update notifications. Here’s a list of productivity and collaboration tools available at Stanford, which include tools such as Wikis, Google Apps, Video Conferencing, and so forth.

Access to resources

Portal

If your organization needs a portal or a “one stop shop” for links and resources, you could be acheive this by using either a wiki such as Confluence, Google Docs, or, yes, by creating a section of private pages on your organization’s website. 

Document management

If your organization needs document management such as providing research papers or resumes for download, Stanford gives you several options including Box for Stanford, Google Drive for Stanford, and AFSHere’s a handy comparison of Stanford’s document management solutions.

Authentication

The typical target audience for an intranet is not the general population. Instead the audience consists of people that are known to the organization and need to login before accessing resources. For a department this may include faculty, students, and staff; for a conference, this may include the organizers, speakers, and attendees. 

If your organization needs to use authentication to manage access to internal resources, Stanford supports this with tools such as WebAuth and Workgroups. These authentication tools integrate with most of the tools listed above.

WebAuth

WebAuth provides a login to access many Stanford web sites with a single sign-on. If your organization needs to limit access to tools and services, you will be able to use WebAuth to provide authentication for accessing Stanford resources such as pages on your website, Box, AFS, and Google Drive,

Workgroups

Workgroups allow you to define groups of Stanford people and grant access privileges based on these groups. If your organization needs to povide access to resources based on groups such as faculty or students, you may find that using workgroups will make it easier for you to manage that access. 

Considerations

So, if you feel that your organization needs an intranet, think through the specific requirements you might need – collaboration? privacy? ... etc. – and before investing your time and resources into building something custom, try out the existing tools. Who knows, maybe you'll find a great fit!

If you have a favorite intranet tool that you use at Stanford, please share. We'd love to hear more about what you use and love!

Caryl Westerberg Posted by Caryl J Westerberg on Friday, November 21, 2014 - 8:18am

Have you ever wanted to put a border on an image or highlight a link for more information in a text field? It is possible to configure the  Styles dropdown menu in your WYSIWYG editor to allow you to add styles to the content in a text field. If you don't know how to configure your Styles dropdown, here's how you can add multiple classes to an element using the HTML editor pane of the WYSIWYG.

Disable the WYSIWYG

To edit the HTML in a text area:

  1. Navigate to the page you'd like to edit

  2. Click the Edit button

  3. Scroll to just below the Body or other WYSIWYG text area

  4. Click on Disable-rich text

You should see the WYSIWYG disappear, and if any content was in the field you’ll see the HTML. To go back the WYSIWYG, click on Enable rich-text.

Adding classes to HTML elements

At Stanford Web Services, our themes support a variety of CSS classes which you can use in a text area. Some of these classes such as float-right are available through the WYSIWYG Styles dropdown menu. Other classes that are available in the theme, but not currently present in the Styles dropdown, such as border-simple must be applied directly to the HTML. 

Suppose you have an image that you want to have both a simple border and to have it float to the right. Here’s how to make that happen:

Add the float-right through the WYSIWYG

Taking advantage of the WYSIWYG, let’s start with the WYSIWYG enabled.

  1. Add the image to the text area

  2. Click on the image to select it

  3. From the Styles dropdown menu, select Image Right

Image of the styles dropdown menu

Add the border directly to the HTML

1.  Disable the WYSIWYG by clicking the Disable rich-text link below the field.

2.  Look for the line with your image. It’ll probably look something like:

<p class="float-right"><img src="https://swsblog.stanford.edu/imagename.png"/></p>

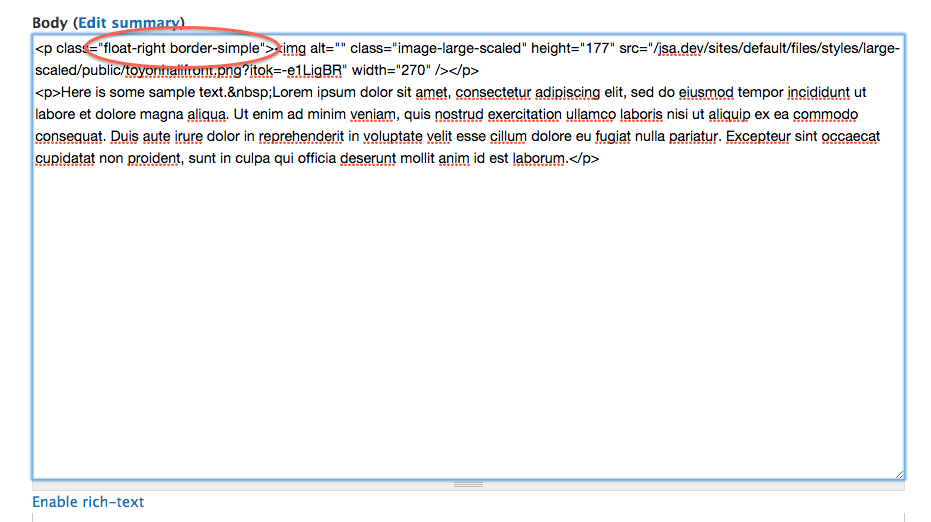
3.  Add the border class, border-simple, to this line. The result should be something like:

<p class="float-right border-simple"><img src="https://swsblog.stanford.edu/imagename.png"/></p>

4. Enable rich-text then scroll to the bottom and click Save.

Check out the results

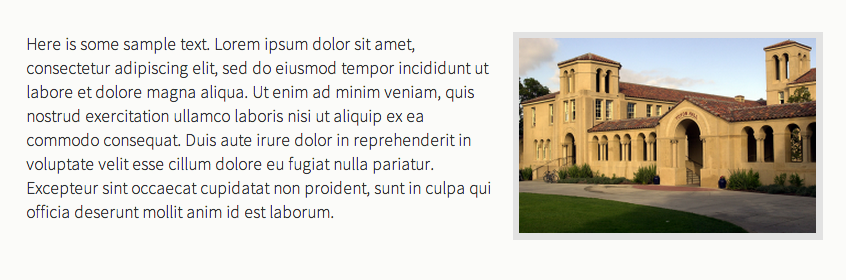
You can see that the image has floated to the right, and if you look, you'll see a border around the image.

More CSS classes from Open Framework Style Guide

You can learn about our CSS classes such as float-right and border-simple  from our Open Framework style guide.
 

Posted in:
Caryl Westerberg Posted by Caryl J Westerberg on Monday, October 13, 2014 - 9:00am

When we launch a site at Stanford Web Services, we open the doors and roll out the red carpet for the search engines to index the site. However, before launch we like to keep the content under wraps and ask the search engines not to index the site. To do this, we use a module called Stanford MetaTag NoBots.

Using the Stanford Metatag NoBots module

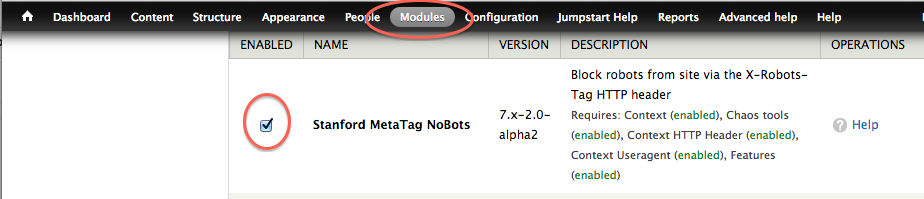
To use this module, after installation, you only need to enable the module. When enabled, this module stops search engines from indexing your site. To allow the search engines to index your site, you disable the module.


If your site is hosted on Stanford Sites, this module is already available on your site; you just need to enable it. Otherwise, you can find this module on Github at:

https://github.com/SU-SWS/stanford_metatag_nobots

To learn more about using this module and tips on checking your site to see what the search engines see, check out the readme.md at:

https://github.com/SU-SWS/stanford_metatag_nobots/blob/7.x-3.x-dev/README.md

How it works (the technical stuff)

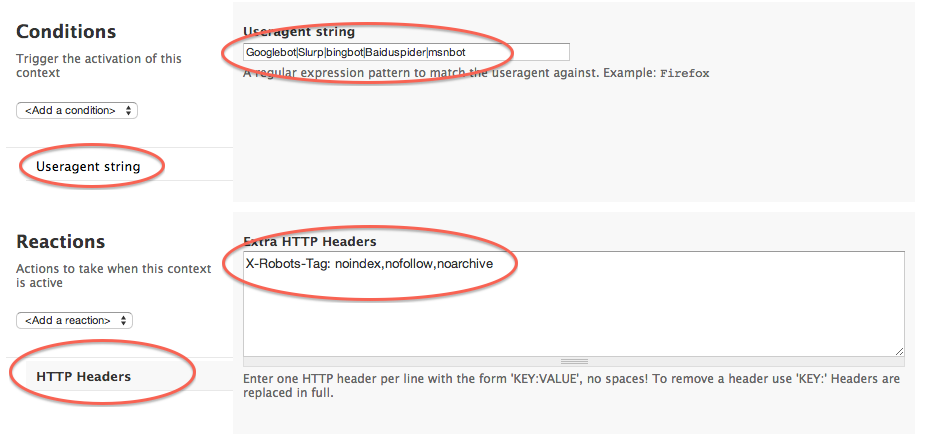
When a search engine crawler (or "robot") crawls a site, it sends information about whichrobot it is, in the form of a user agent string. So Google's crawler will send the "Googlebot" user agent string, Bing will send "Bing", etc. The Context User Agent module allows Drupal administrators to set up conditionsbased on a given user agent string.

When a web server responds to a request for a page, it sends various HTTP headers in its response. One of the (optional) headers is the X-Robots-Tag: noindex,nofollow,noarchive header, which (in short) tells search engine robots, "Hey, don't index or archive this page, and don't follow any links on it either". (Learn more about the Robots Exclusion Standard on Wikipedia.)

We configured Context module along with Context HTTP Header and Context Useragent modules to indentify when the the user agent string is a robot and react with the X-Robots-Tag HTTP headers. The Stanford Metatag NoBots module captures this configuration as a Feature


screenshot illustrating the context configuration

To learn more about using the Stanford MetaTag NoBots module and for tips on checking your site to see what the search engines see, check out the readme.md at:

https://github.com/SU-SWS/stanford_metatag_nobots/blob/7.x-3.x-dev/README.md

Why a new module?

We started out using the MetaTag module on Drupal.org. With this module you can prevent the search engines from indexing the pages on a website. This  module works great at stopping the search engines. In fact, it works too well.

When we went to launch a site, even though we changed the settings to allow indexing, some pages still remained blocked. This was because, even though we unchecked the box, meta tag information for some pages had been saved to the database and did not revert as expected.

Acknowledgements

I’d like to extend a tip of my hat to Shea McKinney and John Bickar for developing and documenting this module, and to John Bickar for contributing to this post.

Posted in:
Caryl Westerberg Posted by Caryl J Westerberg on Monday, July 28, 2014 - 8:00am

Have you ever wanted to show only selected information on a content type to anonymous users and more information to authenticated users? It turns out that you can use Display Suite to provide field-level permissions for an entity.

In this post we'll show you an example of how to use Display Suite to display a field which is only visible for specific roles. In this example we use the Display Suite Field permissions, and create 1) an editable field called Private Info and 2) a code field called View by permission. A code field allows you to display among other things, one or more fields. Private Info is the field you enter the information you want hidden for selected roles, and View by permission displays the information in Private Info according to role permissions. Once View by permission has been created and Display Suite has been enabled for your content type, the code field will appear on the Manage Display page on the content type edit form; you won't see it on the Manage Fields form. You can set who can see the View by permission field on the Permissions page at admin/people/permissions. 
 

Here's how

Create or Identify a Field

  1. On an entity such as a content type (node) or bean, identify or create the field to which you will apply the field-level permissions. For this example, I'll use a content type with the field Private Info (i.e., field_private_info).

Enable and Configure Display Suite 

  1. On the Modules page (admin/modules) enable Display Suite Extras, Display Suite Format, and Display Suite UI
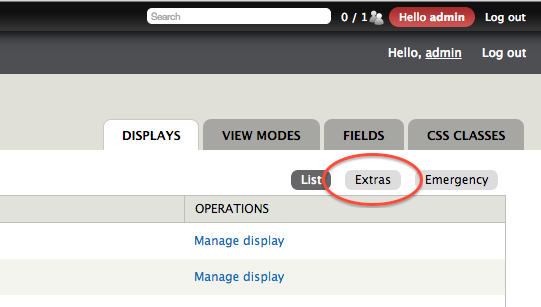
  2. On the Display Suite administration page (admin/structure/ds ) select the Extras tab


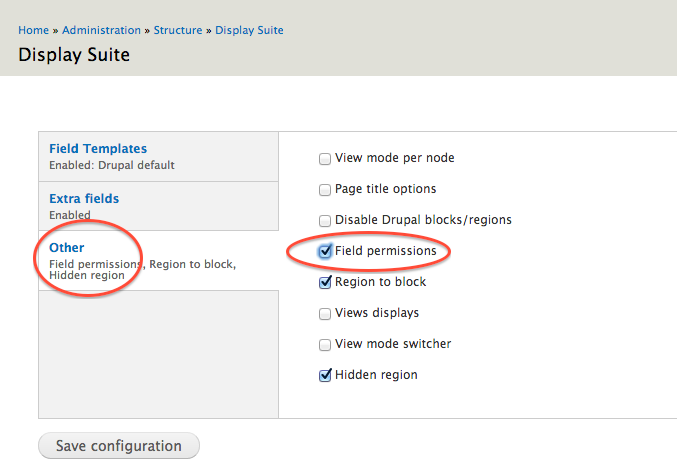
  3. On Extras page, select the Other tab, check Field Permissions, and click on Save Configuration


  4. On the Permissions page (admin/people/permissions), enable the Use the Display Suite code text format for your role


Create a Code Field

In this step you will create a Code Field that can display the contents of your original field and use field-level permissions.

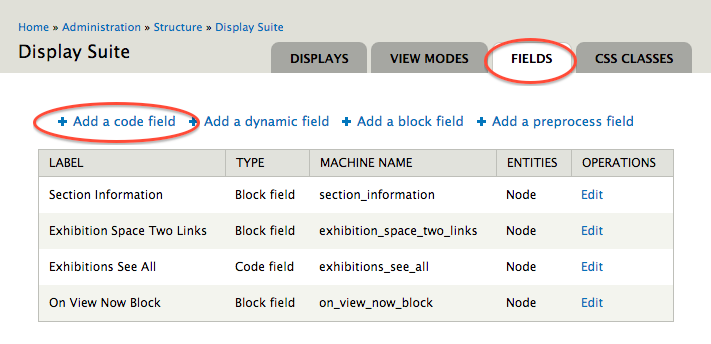
  1. On the Display Suite Fields page (admin/structure/ds/fields) select Add a code field


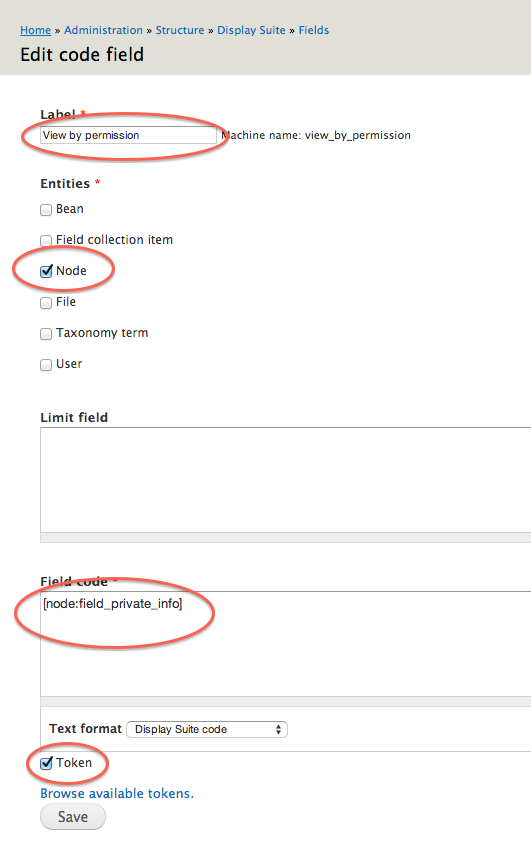
  2. Add the Code Field information for your field:
    1. ​Give it a Label (e.g., View by permission)
    2. Select which Entities can use this code field (e.g., Node)
    3. Select Token
    4. Click on Browse Available Tokens
    5. For the Field code, click on token
    6. Click next on Browse Available Tokens
    7. In the pop-up window scroll until you find the relevant token. In this example, click on Nodes, then click on Private Info (e.g., [node:field_private_info])
    8. Close the Tokens pop-up window
    9. Click on Save


  3. On the Permissions page (admin/people/permissions) select the permissions for the Code Field
  4. Click on Save permissions


Enable Display Suite for Your Content Type

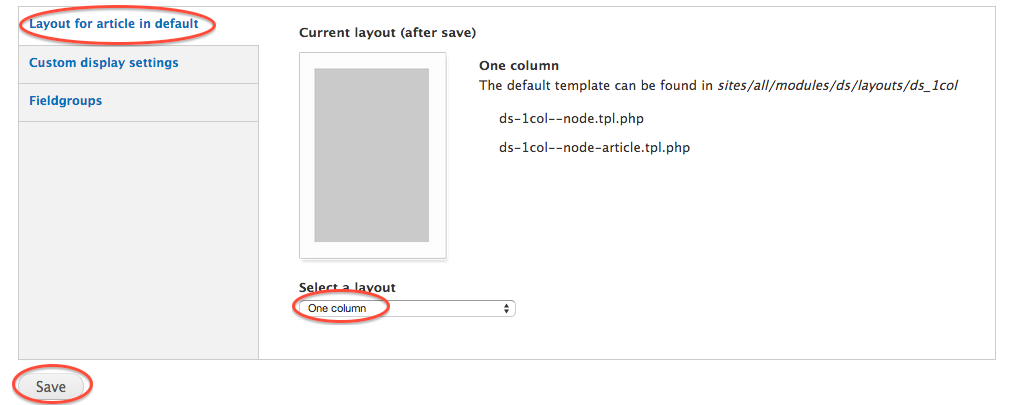
In order for you to access the new code field, you'll need to enable Display Suite for your content type. To do this, you'll need to select a default layout.

  1. Navigate to the content type Manage Display form (admin/structure/types/manage/your_content_type/display)
  2. In the vertical tabs at the bottom of the form select Layout for your content type in default
  3. Select a layout from the dropdown menu
  4. Click on Save

Display the Code Field

With Display Suite enabled for your content type, your new field should appear in the Disabled section on the Manage Display page for your content type. In this step you will allow the newly minted dynamic field to display.

  1. Navigate to the Manage Display form for your content type (admin/structure/types/manage/your_content_type/display)
  2. Scroll down until you see the new code field. It should appear in the Disabled section
  3. Hover over the "+" and move the field to a display region such as "Content"
  4. Select Save

Test it out!

Add data to the new field and view the entity with both the permission to view the field and without permission such as anonymous. 

Troubleshooting

Display Suite makes it easy to adjust field order. However, it is important to take your time when changing field order and allow the Javascript to finish processing before moving a different field or saving. Otherwise  your changes may not be saved properly and the database entry for your content type may be corrupted.
 
If you make any changes to the content in the "Private Info" field you may need to flush the cache to get the changes to show for all roles. 
 

For more information

https://drupal.org/node/2124297 

Acknowledgements

Thanks to Shea McKinney for showing this to me, and to Marion Marquardt for encoraging me.

Posted in:
Caryl Westerberg Posted by Caryl J Westerberg on Monday, June 30, 2014 - 2:45pm

Sometimes things happen that are beyond your realm of control. A page in your website or maybe your whole site goes missing. Then, to add insult to injury, the backups can’t restore the site. What can you do to recover?

Introducing Internet Archive

Take heart my friend, all may not be lost. You may not be able to restore the site, but there might be a record of its content at the Internet Archive (archive.org). According to Internet Archive,

“The Internet Archive is working to prevent the Internet - a new medium with major historical significance - and other "born-digital" materials from disappearing into the past.”

“The Internet Archive is a 501(c)(3) non-profit that was founded to build an Internet library. Its purposes include offering permanent access for researchers, historians, scholars, people with disabilities, and the general public to historical collections that exist in digital format. “

How do I use Internet Archive?

Using the Web collection, it is possible to find archives of your site. These archives are in “flat” HTML format. Only the rendered pages are archived; that is, Internet Archive only saves what a visitor to your site can see.

See archives of your site

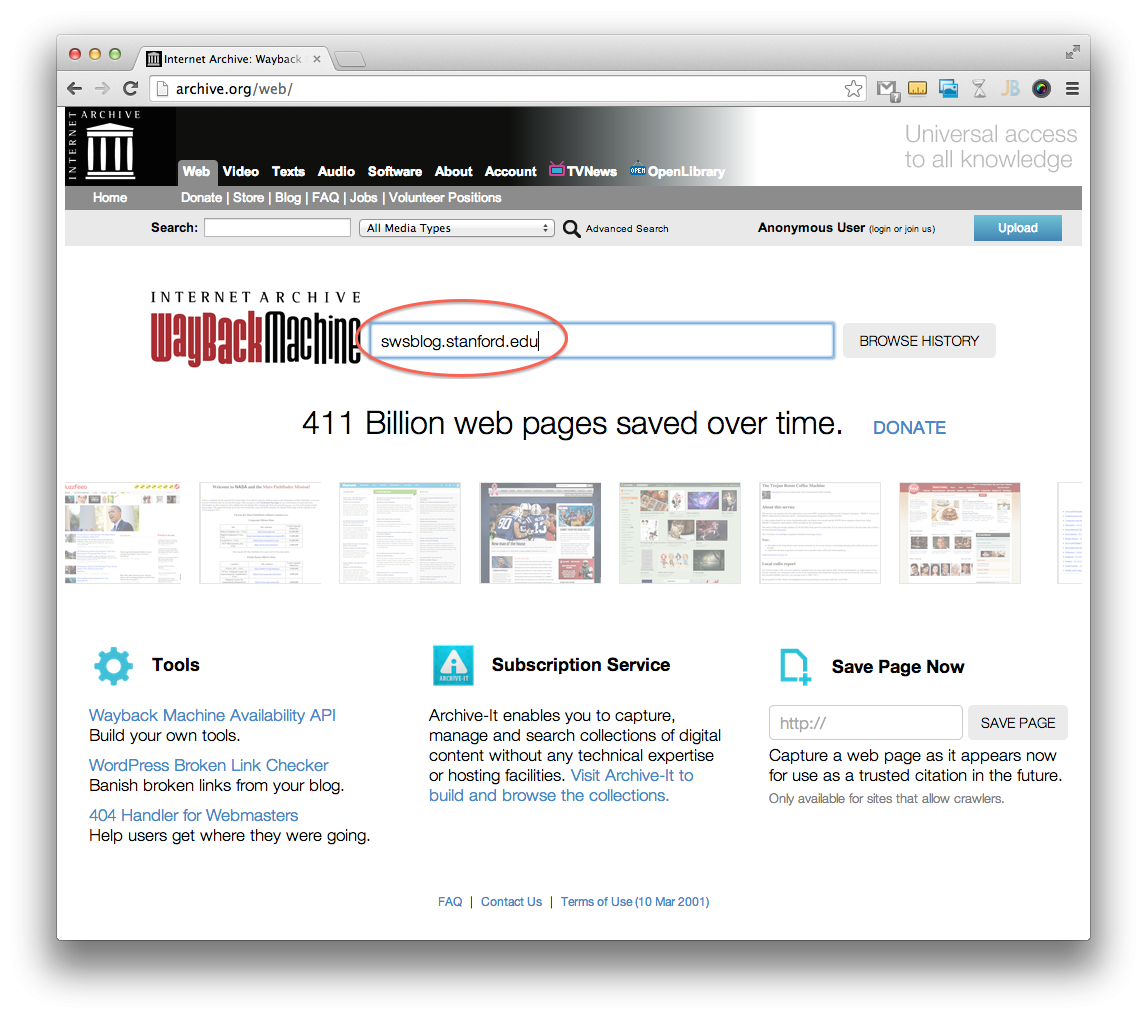
To see archives of your site, navigate to the “Wayback Machine” at https://archive.org/web/, and enter the URL for your site.

This will take you to a calendar page which identifies the dates this site has been saved.

If you click on a blue circle in the calendar, you should be able to navigate through the archive of your site as it looked at that date.

Capture a web page now

To capture your site at the current moment, the WayBackMachine provides a “Save Page Now” option at http://archive.org/web/.  According to Internet Archive, this will “Capture a web page as it appears now for use as a trusted citation in the future.”

Archive your site

Here are some other ways to to help get your site included on an on-going bases in the Wayback Machine:

  • Have other sites link to it and include it in online directories

  • Make sure your site’s “robots.txt” rules allow crawlers on your site

  • Make sure your site is publicly accessible, that is, you don't need a password to see the site

Limitations

The Internet Archive only saves the rendered pages from your site. This includes HTML, CSS, and JavaScript. If you are using a content management system with a database such as Drupal or Wordpress, neither the database, nor any code on the server, such as PHP, is archived.

An archive will not always contain the original site's functionality. According to Internet Archive, when a page requires interaction “with the originating host, the archive will not contain the original site's functionality.”

Check it Out!

Now that you know more about Internet Archive, you might want to visit this site and see previous versions of websites, and to save a web page or two. Hopefully, you will never need to recover content from a missing site, but it’s good to know its there should things get beyond your control. Check it out at http://archive.org/web/.


Posted in:
Tags:

Pages

Subscribe to Caryl J Westerberg's Blog Posts