Skip to content Skip to navigation

Site Retired

As of May, 2022, this website is no longer updated and has been replaced with a static copy.

Cynthia Mijares's Blog Posts

Cynthia Mijares Posted by Cynthia Mijares on Wednesday, May 2, 2018 - 1:14pm

Are you excited about the web and looking to learn more about how web products and projects unfold? Join the friendly and collaborative Stanford Web Services team! 

Stanford Web Services (SWS) is an on-campus web design and development team offering:

  • web design, development, and production services;
  • oversight of university web branding, including themes and style guidelines; and
  • project consultation and guidance

Learn more at webservices.stanford.edu

SWS is looking for a self-directed and detailed-oriented student interested in web design and development to assist with multiple ongoing projects. Potential tasks may include: user research and usability testing, migrating web content and basic website building and styling, conducting quality assurance on new site development, content strategy for external communications, automated testing, and writing/reviewing documentation.

What you’ll gain

  • HTML, CSS and Drupal theming and/or Drupal development and testing skills
  • Behat automated testing skills
  • Using Git in a collaborative web development environment
  • Best practices for communicating with clients
  • Experience working in a web development shop
  • Agile (scrum) project management basics

$18/hour full-time for 8 weeks over the summer quarter. 

What you are now

  • A clear and concise writer
  • Comfortable learning new technologies quickly
  • Organized and good at time management
  • Good in a self-directed environment
  • Happy on a collaborative, detail and goal-oriented team
  • A little bit crazy about the web

Also, it would be great if you had any of the following, but it's not critical (we can teach you!):

  • Familiar with web technologies (Drupal, HTML, CSS)
  • Skills in Photoshop, Illustrator, Balsamiq, etc.
  • Familiar with the basics of user testing

To apply

Email Alyssa Hislop (ahislop@stanford.edu), Customer Experience Specialist at Stanford Web Services

Please include a résumé (and a link to your portfolio or LinkedIn profile, if applicable), details about any relevant experience, and a bit about why you want to work with Stanford Web Services. Bonus points if you are active on Github or Drupal.org and include a link to your profile!

Application deadline: May 18, 2018

Posted in:
Cynthia Mijares Posted by Cynthia Mijares on Wednesday, July 12, 2017 - 8:04pm

The Stanford WYSIWYG gives the content editor multiple style options to modify the look of their site's content.  Suppose you want the ability to float an image right or left in the content region but it's not in the list of Styles. You can create a CSS Injector rule to target that specific content then make this style available to the WYSIWYG Styles drop-down list. To tackle this example, let's go step-by-step to add the ability to float images right or left in the content region within the WYSIWYG.

Create a CSS Injector rule for your class name

In the Stanford Sites environment, we utilize the CSS Injector module to add CSS to a site.

  1. Ensure that the CSS Injector module is enabled
  2. From Configuration > Development > Select CSS Injector
  3. Click Create a new rule
  4. Add CSS rule(s)
.float-right {
   float: right;
   margin-bottom: 15px;
   margin-right: 0;
}

.float-left {
   float: left;
   margin-bottom: 15px;
   margin-right: 15px;
}

Add CSS styles to text formats

Text formats define how editor environments behave. We'll incorporate the CSS in the "Content Editor Text Format".

  1. From Configuration > Content authoring > Text formats > Select Content Editor Text Format
  2. In the Filter settings > WYSIWYG Filter horizontal tab > Rules for Class Names, add “float-right” and “float-left”
  3. Click Save configuration

Add CSS styles to the WYSIWYG

  1. From Configuration > Content authoring > Select Wysiwyg profiles
  2. Edit the Content Editor Text Format
  3. In the CSS section > CSS classes, add Image Right=p.float-right and Image Left=p.float-left on separate lines
  4. Click Save

Check out and use your new Styles in the WYSIWYG drop-down list!

Posted in:
Cynthia Mijares Posted by Cynthia Mijares on Thursday, May 12, 2016 - 9:06am

Want to hide or move the WebAuth login block on your website? On Stanford Sites the login block is in the left sidebar by default giving the administrator easy access to log in and make changes to their website. As an administrator you have the option to move this block to a different region or completely hide it.  Let's talk about both options and their ramifications.

If you have multiple people collaborating on your site, you may choose to keep the WebAuth Authentication block visible somewhere on the page.

If you are the only person who needs to make changes to the website or you do not want to give anonymous visitors the option to log in, you can choose to hide the WebAuth Authentication block.  You can still log in via WebAuth just go the the URL and add /user to access the log in screen. For example: Go to https://people.stanford.edu/SUNETID and change the path to https://people.stanford.edu/SUNETID/user.  You will see the User account page where you can click on the Log in with WebAuth link.

User account log in screen

Move or hide the WebAuth Login block

  1. Click the Log in with WebAuth.
  2. From the Admin menu bar, navigate to Structure > Blocks.
  3. Locate the WebAuth Authentication block in the First sidebar region.
  4. Use the double-pointed arrow to drag this block to another region or use the drop-down list to select a region. To hide the block, select - None - from the drop-down list or drag it to the Disabled section.
  5. Then scroll to the bottom of the page and click Save blocks.

WebAuth Authentication

Posted in:
Cynthia Mijares Posted by Cynthia Mijares on Thursday, December 17, 2015 - 8:00am

2015 has been amazing! Big thanks to all of our wonderful and devoted colleagues around the university and in the community. We wish you happy holidays over the winter break, and we'll see you in 2016!


Team photo

Posted in:
Cynthia Mijares Posted by Cynthia Mijares on Monday, November 9, 2015 - 11:11am

This module allows you to save versions of a page in a draft state before publishing.

Posted in:
Cynthia Mijares Posted by Cynthia Mijares on Monday, November 2, 2015 - 7:00am

Our team created the Stanford Sites Jumpstart service to help website owners focus their energy on what matters most: their content. To do this, Jumpstart includes a dashboard for simple content maintenance. This "Manage Content" feature offers an overview of all pages in the site and supports updating individual or multiple pages at one time.

Once you've logged in to your Jumpstart-based site, select Manage Content from the Site Actions menu.  

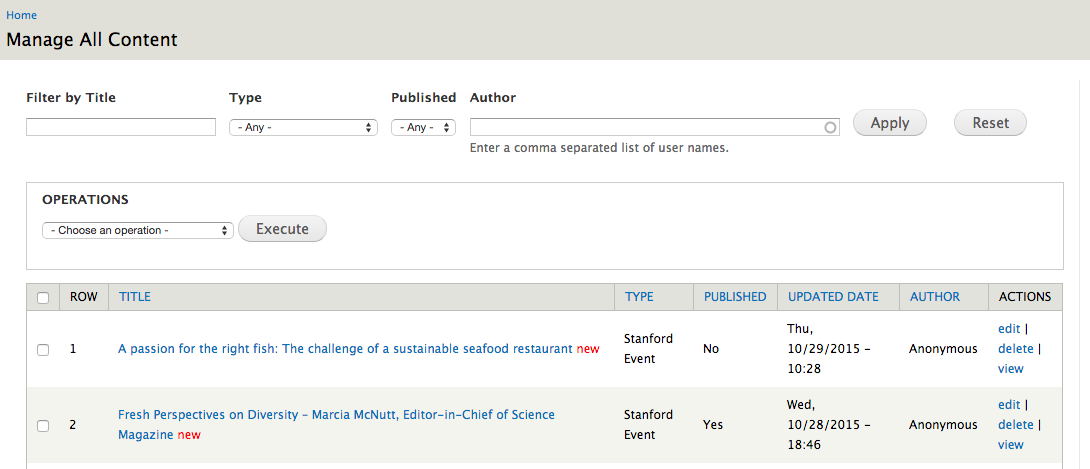
From here you can see a table with all the pages in your site:  

Manage All Content

Filters

Use the filters at the top to narrow the display of content.  For example, if you only want to see published pages and exclude the unpublished pages, filter by Published status "Yes" and then click the Apply button. As a result, you should only see the event title "Fresh Perspectives...".  Click the Reset button to clear all search filters and to expose all your content.

Sort

You can sort content in ascending or descending order by clicking on the column heading titles.

Actions and Operations

From the Manage All Content page, you can edit, delete, or view any individual page. You can perform these actions on several pages at once by checking the box in column one for the items you want to update. Then choose an operation from the Operations drop down, and click the Execute button.

Manage Content by Type

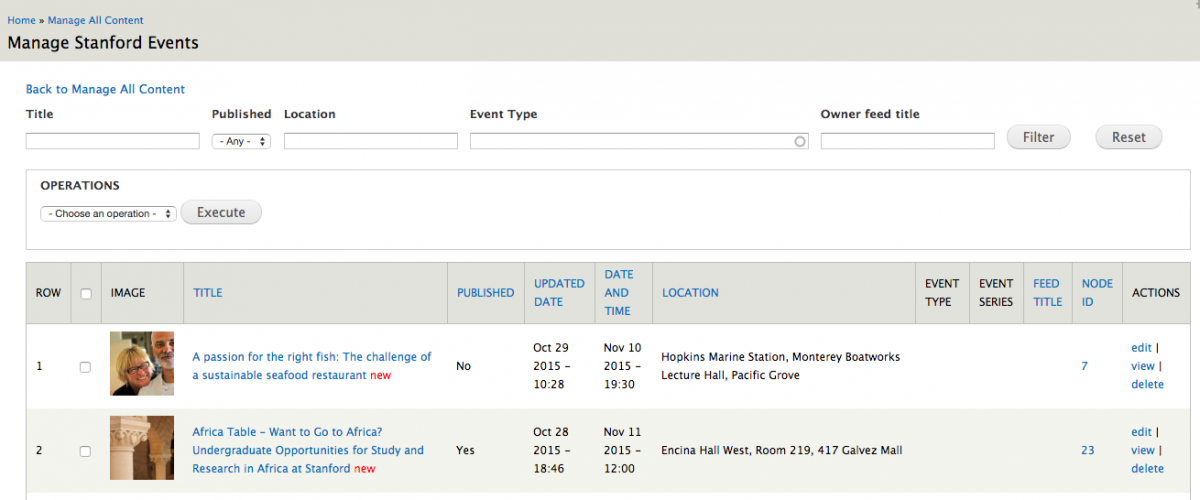
Depending on the type of Jumpstart product, you may see in the right sidebar the option to manage content by content type. For example, if you only want to manage events, click on the Manage Events link to get a customized screen that has fields specific to the Events content type.

Manage Content by Type

Manage Events


Read more

Check out more information about the features included in the Stanford Sites Jumpstart service, and let us know what you would like to see.

Posted in:
Cynthia Mijares Posted by Cynthia Mijares on Wednesday, May 20, 2015 - 8:55am

As a guest, StanfordWho.stanford.edu has the ability to search by name, email, work phone, or SUNet ID. As an authenticated user, you can check the Search in Stanford view option to see more information. Here's a tip to customize the URL link to a profile page on StanfordWho.stanford.edu.

Example link to a public listing

http://stanfordwho.stanford.edu/SWApp/lookup?search=Cynthia%20Mijares

This link points to my public profile page in StanfordWho.stanford.edu.

Example link to a Stanford and affiliates only listing

http://stanfordwho.stanford.edu/SWApp/auth/lookup?search=Cynthia%20Mijares

This link points to my authenticated view profile page in StanfordWho.stanford.edu.

Note: Use %20 for spaces between names when customizing links to a profile page.

Posted in:
Cynthia Mijares Posted by Cynthia Mijares on Monday, March 9, 2015 - 11:00am

What happens when the one guy who has access to manage users on your Drupal website leaves? Do you have a team of people that needs to work on the website, but those people change over time? Do they all have a SUNet ID? Take advantage of the Stanford WebAuth Module features and manage access by mapping Stanford workgroups to Drupal roles. 

Learn more about Stanford Workgroups

Set up a Workgroup Role Mapping

  1. Setup Role Mappings.
  2. Verify the WebAuth module is enabled.
  3. From the admin menu bar, navigate to Configuration > WebAuth > Role Mappings
  4. Select the Drupal Role, enter the Workgroup name, then click Add Mapping button.

WebAuth Mappings

Drupal role(s) are assigned automatically to people who log in with WebAuth that are part of an assigned Workgroup.

Posted in:
Cynthia Mijares Posted by Cynthia Mijares on Friday, December 5, 2014 - 8:21am

Drupal has a couple of standard ways to display content using a Default view or a Teaser view display. Stanford Web Services uses View modes to create multiple image/Field Collection displays and allows the site builder to change how fields will be displayed. 

Enabling View modes on your site

  • From the Modules menu, enable Display Suite and Display Suite UI. If necessary, flush the Menu Cache.
  • Navigate to Structure > Display Suite.
  • Click View modes tab.
     

Create new View mode

  • Click + Add a view mode.
  • Fill in the Label field.
  • Edit Machine name (if necessary).  Stanford Web Services recommends that you choose your machine names carefully.  Pick a prefix for your organization or use one that is already in use by your organization (e.g., soe_ , gsb_ , etc.).
  • Select Entities for which the view mode will be available.
  • Then click the Save button.


Manage the display of the new view mode

  • From the Display Suite View modes page, click on the Displays tab, then click Manage display for the item you are targeting.
  • ALWAYS START FROM DEFAULT.
  • Click the Custom display settings horizontal tab, then select the view mode you just created.
  • Click the Save button.
  • The View mode is now available.


  • You can show/hide the field label and show/hide individual fields.
  • Click on the gear and choose from your available Image styles. 
  • Then click the Save button.
Posted in:
Cynthia Mijares Posted by Cynthia Mijares on Monday, September 29, 2014 - 8:00am

Recently a couple of clients wanted to add a background banner image to their site.  This is a great option for a site that is more text heavy.  With the administrator role, you can use CSS injector to make your site look unique.

The instructions listed here refer to themes where header background image is not an option.  If you are using the Stanford Light theme, you can easily add a background image to the header from the theme options.

Preparing the image

There are a couple ways to host your image online:

  1. In your dept/group/personal AFS web space.  Refer to the IT Services page on Transferring Files to AFS.
  2. On your Drupal website, create a page and add the image as an original size so you can copy the direct URL to the image. Save the page in an unpublished state.  The path to the image still works.  Refer to SWS User Guide on inserting an image into the WYSIWYG editor.

Configure the image

  1. Be sure to enable the CSS Injector module.
  2. From the admin menu bar, navigate to Configuration > Development > CSS Injector
  3. Click the Create a new rule link.
  4. Copy and paste the code below.  You will need to provide the URL link and adjust the padding etc. to fit your website.
#header {
    background-image: url("https://somesite.stanford.edu/../sites/default/files/image.png");
    padding: 40px 0 50px;
    margin: 0 0 10px 0;
    background-repeat: no-repeat;
    background-size: 100%;
    background-position: top;
}

Things to consider when choosing a background banner image

  • Contrast. The site title should still be legible.  Keep the image clean and uncomplicated.
  • By getting clear on your site goals, this will help in choosing the right image.


Posted in:

Pages

Subscribe to Cynthia Mijares's Blog Posts