Skip to content Skip to navigation

Site Retired

As of May, 2022, this website is no longer updated and has been replaced with a static copy.

Linnea Ann Williams's Blog Posts

Linnea Williams profile pic Posted by Linnea Ann Williams on Tuesday, July 16, 2013 - 11:17am

Get people more engaged in your content! With this post, I'll outline two basic guidelines for writing good Calls to Action to lead users through your site.

What is a Call to Action?

A Call to Action is a snippet of text with a link, sometimes styled as a button or with an arrow after it. Use Calls to Action when you want to get your readers to do something — whether it's to click through to another page, download a document, or even purchase something. A few basic academic examples might be: 

  • "Learn more about our programs"
  • "View the full calendar"
  • "Peruse our list of publications"
  • "Get adivising in writing"
  • "Read about Professor Smith's award

In SWS, we create places for links on slideshows or at the bottoms of blocks, so that it will be easy for people to add Calls to Action where they might be needed. But how do you decide what those links should say?

Writing a strong Call to Action

Start with a verb

The most important part of a Call to Action is the leading verb. People are far less likely to click on a link that is a noun, they want to be led through your site. Rather than "About Us," try "Read about our team."

Now that you're starting off on the right foot, remember to elaborate a little.

Give a little detail

One of the common mistakes in writing Calls to Action is making them too short. "Read more" or just "More" is less compelling to readers, and also causes accessibility and Search Engine Optimization problems.

Blind or visually impaired readers aren't as able to scan the page visually and know the context of links and, in the same way, the bots (website scanners) that companies like Google use will not be able to form as complete data from links with non-specific text like "More." For those reasons, it's important to say Read More about what.

Examples of Calls to Action

Weaker Stronger
Our Mission Read more about our mission
Orientation Volunteer Application Apply to be an Orientation Volunteer
Overseas Students meet the president

Learn how Overseas students responded to meeting the president

More See More Events
Read More Read more about the author
Apply Now Download PhD Application
Full list of our programs Find the program that is right for you (great Call to Action from bosp.stanford.edu)
Student Project Gallery Check out our Student Project Gallery (great Call to Action from undergrad.stanford.edu)

The recently launched Administrative Guide has a great example on their homepage slideshow, with the following Call to Action text: "Stay informed on financial policies and procedures"
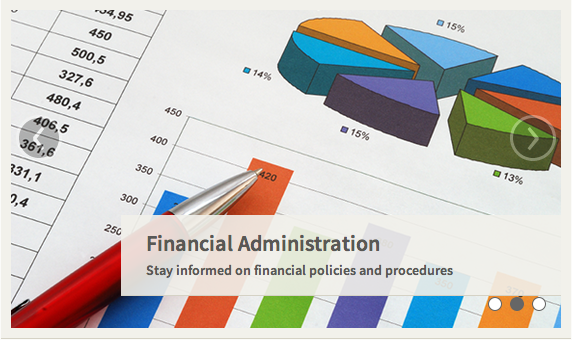
Example of Call to Action from the Stanford Administrative Guide

Interested in reading more?

Here is another post that I found helpful, if you want to know even more about specific word choices and their ramifications.

  • http://contentverve.com/10-call-to-action-case-studies-examples-from-button-tests/

And remember, these are guidelines, not rules. Sometimes you'll encounter constraints, like the size of the area provided, that will also play a part in the text you choose. A small button probably will be better served by "More Events" than "See More Undergrad Events." So, always use your best judgement.
Posted in:
Linnea Williams profile pic Posted by Linnea Ann Williams on Thursday, June 27, 2013 - 9:00am

As a serious navigation advocate, it drives me crazy to have an active "Blog" or "Calendar" link in my main menu when I'm looking at the overview pages for that section, but then the active link goes away when I look at a specific Event or Blog Post. Am I in the Calendar section or not?

Enter one of my favorite Drupal modules: Menu Position.

The Menu Position Module

Menu Position allows you to make it appear that a piece of content is in a certain place in the menu without having to actually place it there, based on conditions you can set. Meaning, I can tell Drupal to "pretend" that every blog post is in the main menu under Blog and if I'm looking at a Blog Post, the main Blog link will be active. Win!

Say I didn't have this module, but really wanted "Blog" in my main menu to be active when someone is reading a Blog Post node. My only real option is to add every blog post to the menu, but that's a lot of work and would create a mess in my menu! Not worth the hassle, even if you have the same pet peeves as me.

Configuring Menu Position

Configuring Menu Position is pretty straight forward once you've enabled the module. Here's an example wherein I will place all Articles under "What's New."

  1. Go to /admin/structure/menu-position/add
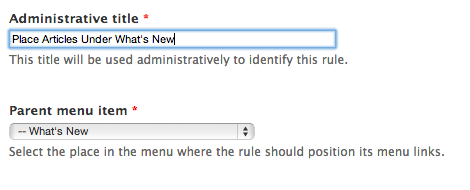
  2. Title your Menu Position. Mine is called "Place Articles Under What's New" (see screenshot)
  3. Choose the Parent menu Item. In my example "What's New" (see screenshot)
  4. In Conditions, select the Content Type you want to make a Menu Position rule for. Mine is "Article"
  5. And Save

You can also make menu position rules based on path, user role, or taxonomy.

Screenshot of Menu Position Configuration

Menu Position and Stanford Sites

Menu Position is on the short list of modules to be added to the Stanford Sites platform. Coming soon!

Do you have any menu pet peeves like me? What do you think makes for great navigation?

Posted in:
Linnea Williams profile pic Posted by Linnea Ann Williams on Monday, June 17, 2013 - 9:00am

Last December, my coworker Zach Chandler wrote a great blog post on the core principles of Agile Project Management and how to think about them in relation to web development at Stanford. In Zach's "Be Careful What You Ask For" section he briefly outlines the challenges for the Product Owner (primary decision maker) in Agile projects: balancing the power to change project direction with budget and time constraints. In this post, I'd like to go into the role of the Product Owner in a bit more depth.

Your Friendly Product Owner

One of the key players in Agile Project Management is the Product Owner. The Product Owner holds the vision of the product on behalf of the client and represents the interests of the client to the development team. The Product Owner is tasked with prioritizing the backlog (to-do items) for the project to make sure that the stakeholders are getting the most value for their dollar. For Web Services, I often wear the Product Owner hat, working closely with stakeholders to build great websites.

Prioritizing Features to Get the Most Value for Your Money

I like to think of it this way: at the start of a project, we often have some sense for what we'd like from a new website. Then, as the project moves along, we think of other features that would be really valuable as well. However, we start to have a list that is no longer achievable within our budget and timeline. For the most part, every new feature that is added mid-stream will likely bump some other feature we had initially planned off the list of features that will be completed by the end of the project.

So, the idea is to maximize the value of your dollar. Is that new feature going to serve way more people or be way more useful than something else you were planning on? Then move it to the top of the backlog! If not, move it lower in the backlog and consider it for a Version 2 of your project.

Agile Product Ownership in a Nutshell

Check out this great video by Henrik Kniberg.

Linnea Williams profile pic Posted by Linnea Ann Williams on Wednesday, May 8, 2013 - 5:31pm

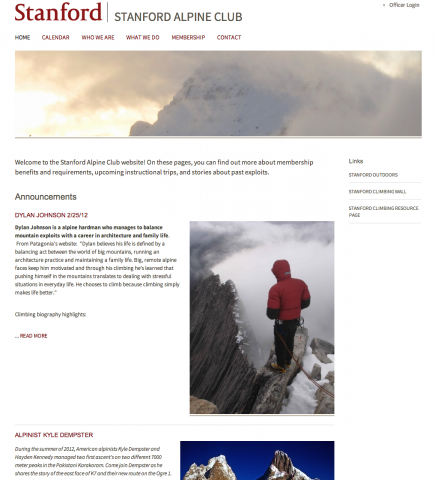
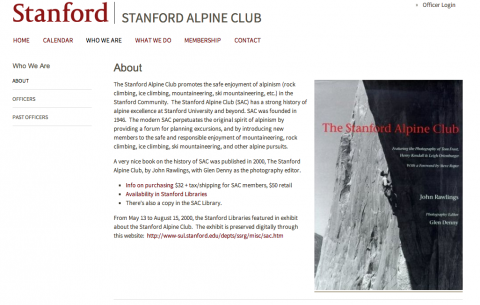
The Stanford Alpine Club (SAC) recently transitioned to a new website on Stanford Sites. All styles are custom written into CSS injector to reflect the new Stanford identity and SAC has leveraged some of the responsive behaviors of Stanford Modern to make their site mobile friendly. Okay, I admit it. I built this site... :)

Way to go Alpine Club and be safe out there!

Sites Superstars is an ongoing series where we highlight creative, innovative, and just plain excellent websites using the Stanford Sites platform. Have a superstar you'd like to see featured? Contact us.
Posted in:
Linnea Williams profile pic Posted by Linnea Ann Williams on Monday, February 25, 2013 - 12:48pm

In my last post on Menu Tricks, I outlined a module called Menu Block, that made it possible to use just one giant main menu to manage your site navigation, while still displaying lower level items in different regions of your design and on different pages on your site.

Now that we're using the main menu as an architectural framework for our website, not just as a way to place some links on the top of site, more automated functionality will become available. Drupal loves it when we systematize our structures and rewards us.

In this post, I'll discuss how you can automate your page URLs based on where they are positioned in the main menu.

Automating URLs Based on the Main Menu

To automate your page URLs based on menu position, you will need to enable the Pathauto module.  This module is readily available on Stanford Sites. For sites hosted elsewhere, it is downloadable from here: http://drupal.org/project/pathauto

Basic Use of Pathauto

Most Drupal builders have used Pathauto before to create simple formulas for their site URLs based on content types.  For instance, you might make the path for blog posts into blog/[node-title].  With that formula, this blog post would be blog/menu-tricks-3-automating-page-urls-based-on-menu-position.  Pretty straightforward.

However, this method doesn't work great for pages that are used at different locations in your sitemap. Creating a good Pathauto setting for the Basic Page content type requires more finesse.

Pathauto and Menu Parent Token

In the example above, I used a token (a site variable) called [node-title] to build the pattern for the URL. There are a huge number of tokens available in your URL options, but there's one in particular that is required for making a URL based on menu location:

[node:menu-link:parents:join-path]

The above token displays the path of the node that is the parent of the current node.  If you have a page in your menu called About and another page Contact beneath About, About is the parent of Contact.

To build a pathauto setting that will make the URL for our page Contact into about/contact, we will want to display the parent URL and then the node title.  Or: 
[node:menu-link:parents:join-path]/[node:title]

One thing to remember is that this pattern will only work if the parent page has already been created, so it will be important to build your site pages from the top down, in terms of menu location. And pages will not automatically update when you change a parent path, which means that if you change a parent node's URL, you'll want to: edit the children pages, click "Generate automatic URL alias" and save again.

Pathauto on Stanford Sites

Pathauto is one of the many modules currently available on the Stanford Sites service.  The module offers lots of great options for creating URLs on your site, beyond the menu approach above. I highly recommend it!

Posted in:
Linnea Williams profile pic Posted by Linnea Ann Williams on Wednesday, February 6, 2013 - 2:59pm

The main menu in Drupal is a very powerful tool when partnered with the right modules and configurations.  The menu can be used to automate URLs, build breadcrumbs and create secondary navigation.  

In this post, I'll be walking through a module that can help you use the main menu to automate all of your menus and simplify your secondary navigation.

USING THE MAIN MENU AS YOUR SITEMAP

When you're building in Drupal, I highly recommend putting all of your pages into one giant main menu.  Think of your main menu as the sitemap for your website. 

This will help you clarify the structure of your site, which is always a great practice.  But it also opens the door to very nifty automated configurations.

You may be thinking to yourself, but this will cause me lots of duplicated work for items below the top or secondary item level because I'll have to add nodes to the main menu and to the one-off menus that I place in those sections of the site. That's where menu block comes to the rescue.

MENU BLOCK AUTOMATES YOUR NAVIGATION

With Menu Block, it's possible to create a block that displays menu trees starting with any level and going to any depth. Here's an example: 

I have a site with a horizontal main menu in the header that only displays top level items.

I want to add a sidebar menu that will display secondary and tertiary main menu items underneath each top level item. Here's how to do that with the Menu Block module installed:

Making a Menu Block

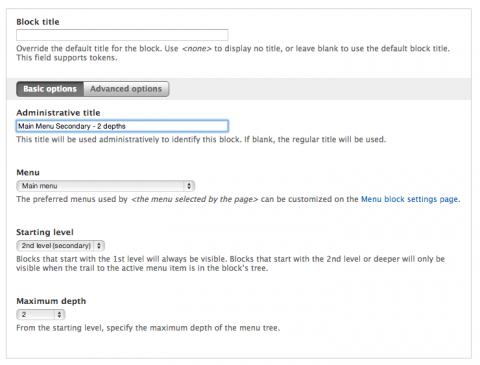
  1. Go to Structure > Blocks > Add Menu Block
  2. Optionally add a block title.  If you leave this blank the block title will be the parent item of the branch of the menu you are looking at.
  3. Create an Administrative title for the block.  You probably want to include the name of the menu, the starting level and depth in the title.
  4. Choose the menu you are making the block from.  In this case, main menu.
  5. Choose the starting level, this is the depth of the links that will appear.  To show the top level items, you would choose 1st level.  In this example I'm using 2nd level.
  6. Choose the maximum depth.  This will determine the number of levels that will appear.
  7. Save


Placing the Menu Block

Using the core block system or a module like Context, place the new Menu Block on all pages where you would like to have an automated main menu.  

For a simple site, I often will place this block on all pages but <front>.

Testing Your Menu Block

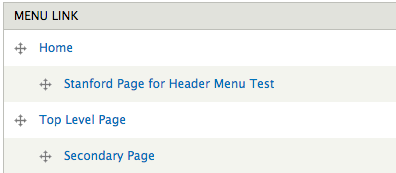
If you haven't yet, add some secondary (and tertiary) pages to your main menu tree.

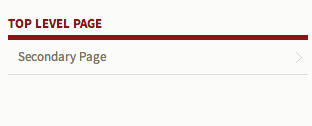
I added a test page that is a child of Home and another that is a child of Top Level Page.  I've included a screenshot of my menu tree, as well as the new menu I see in the sidebar of "Top Level Page" and "Secondary Page".

Simple and pretty nifty!


MENU BLOCK AND SITES

Menu Block is one of the modules that is on the short list to be added to the Sites service here at Stanford!  Stay tuned.

Linnea Williams profile pic Posted by Linnea Ann Williams on Monday, January 14, 2013 - 4:53pm

One of the needs that we frequently encounter on campus while building sites is linking to forms and documents like pdfs from within text areas like the body field in Drupal. Note: I've updated this blog post to reflect the newest version of Box as of 9/24/2014.

The Old Way

The old way to link to documents was through Drupal's file system.  One approach might be:

  1. Create a content type Uploaded Document with a file upload field.
  2. Add content by uploading files one by one into the Uploaded Document content type.
  3. Copy links from the saved Uploaded Document nodes into your WYSIWYG.

The above solution has a handful of drawbacks:

  • groups all uploaded documents into a single folder within your Drupal file system
  • makes duplicate documents in your files if you upload a revision 
  • changes URL when you upload a revision
  • cannot bulk upload files unless you have server access

The BOX Way

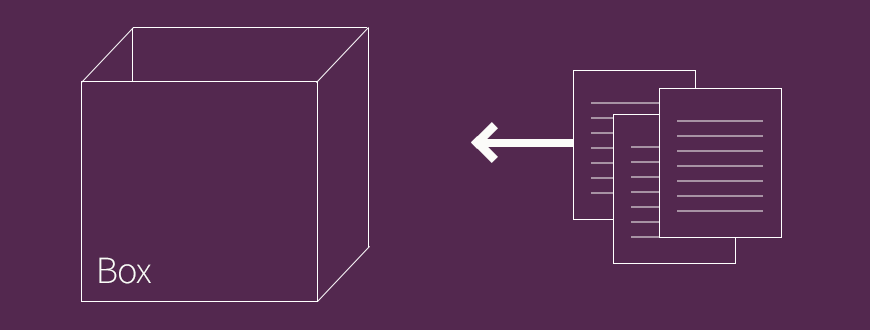
A new approach that we're beginning to use on sites is to use Box to house all of the documents that we want to link to!  Some content/images have been borrowed from this post on making direct download links in Box's documentation.

The process is:

  1. Add document to any folder in Box.
  2. In Box's online interface at box.stanford.edu, find the document.
  3. Use the down arrow menu on the far right to choose Share. This will give you the advanced Share options.
  4. Change file Access in the pop-up window to 'Anyone with a link.'  See 2nd image below.
  5. On the pop-up window select the address shown beneath the 'Direct Link' field. This link will include the file extension. See 3rd image below.
  6. Paste this link into Drupal. 

Here is an example: https://stanford.box.com/shared/static/ac04hduohqfssrniws47.png.  This image is in one of my Box folders.


The Benefits

Compared to Drupal's default file storage, Box is a much better at digital asset management.  Using Box to manage your documents for web has the following benefits:

  • documents are readily accessible for editing by those with edit permissions
  • revised documents retain the same URL
  • Box automatically stores revisions of your documents
  • bulk uploads of documents into a folder is no problem
  • more sensitive documents can require Box login to view
  • documents can be organized into subdirectories for easy tracking
  • documents won't impact your AFS storage limit

What you need to know

If your website is for a department, be sure you link Box to your Stanford Workgroup so the quota is counted towards the department rather than your individual account. Also, the account will need to be configured to post public documents.  To do that:

  1. In Box click on the gear icon in the top right and choose 'Account Settings'
  2. Click 'Content & Sharing' tab
  3. 'Enable external links to:' 'Folders and files'
  4. '...with access options:' 'Open, Company, and Collaborators Only'
Posted in:

Pages

Subscribe to Linnea Ann Williams's Blog Posts